> ## Documentation Index
> Fetch the complete documentation index at: https://developer.jtl-software.com/llms.txt
> Use this file to discover all available pages before exploring further.
# Architecture Overview
> Understand how JTL Cloud Apps are structured, how they communicate with the platform, and the four integration types available.
## What is a JTL Cloud App?
A JTL app is a software application that connects to JTL products or services through the API infrastructure. Apps can:
* Extend the functionality of JTL products
* Integrate in JTL products
* Provide specialized processes or tools for specific business needs
* Automate workflows between JTL and other systems
Every Cloud App consists of two components:
* **Frontend**: your app's UI, rendered inside an iframe within the JTL [ERP Cloud](https://erp.jtl-cloud.com/). Built with any web framework (React, Vue, or plain HTML).
* **Backend**: your server-side code that authenticates with JTL's Identity Provider, calls the JTL Cloud and JTL-Wawi API, and serves your frontend.
```mermaid theme={null}
flowchart TB
subgraph App ["Your App"]
FE["App Frontend
(iframe)"]
BE["App Backend"]
end
subgraph JTL ["JTL Platform"]
Cloud["JTL Hub"]
ERP["JTL Cloud / JTL-Wawi"]
AB["AppBridge"]
IDP["Identity Provider"]
API["JTL Cloud API"]
end
FE <-->|"AppBridge
Messages"| AB
AB <--> ERP
BE -->|"OAuth2
Client Credentials"| IDP
IDP -->|"JWT Access Token"| BE
BE -->|"Authenticated
API Calls"| API
Cloud -->|"Install / Manage"| App
style App fill:#FFF2EB,stroke:#FB581F,stroke-width:2px,color:#0B1B45
style JTL fill:#E8F4FF,stroke:#89D2FF,stroke-width:2px,color:#0B1B45
```
The frontend communicates with the JTL Cloud host application through **AppBridge**, a bidirectional messaging layer built on `postMessage`.
Your backend authenticates independently using OAuth 2.0 client credentials and calls the JTL Cloud API with a JWT access token.
## Integration Types
Cloud Apps support three integration types. Each type determines where your app appears, how it communicates, and what kind of experience it provides.
| Type | UI | Communication | Use case |
| -------------- | ---------------------------- | -------------------- | ---------------------------------------------------- |
| **Hub-Link** | Card in JTL Hub | Redirect to your URL | Entry points, external tools, dashboards |
| **ERP-iFrame** | Embedded in ERP main content | AppBridge messages | Rich interactive UI within the ERP |
| **Panel** | Sidebar in ERP | AppBridge messages | Context-aware panels (e.g., customer detail sidebar) |
All three types require a `manifest.json` and app registration through the [Partner Portal](https://partner.jtl-cloud.com/).
### Hub-Link
A Hub-Link app adds a card to the JTL Hub dashboard. When a merchant clicks it, the platform redirects them to your `appLauncher.redirectUrl`. This is the simplest integration type: no iframe, no AppBridge, just a redirect.
 Use Hub-Link for external dashboards, standalone tools, or apps that don't need to render inside the JTL UI.
```json theme={null}
{
"capabilities": {
"hub": {
"appLauncher": {
"redirectUrl": "https://your-app.example.com/dashboard"
}
}
}
}
```
### ERP-iFrame
An ERP-iFrame app renders inside the main content area of ERP Cloud. Your frontend loads in an iframe and communicates with the host through the AppBridge. You define where your app appears using `menuItems` in the manifest, which adds entries to the ERP sidebar under **App** menu item.
Use Hub-Link for external dashboards, standalone tools, or apps that don't need to render inside the JTL UI.
```json theme={null}
{
"capabilities": {
"hub": {
"appLauncher": {
"redirectUrl": "https://your-app.example.com/dashboard"
}
}
}
}
```
### ERP-iFrame
An ERP-iFrame app renders inside the main content area of ERP Cloud. Your frontend loads in an iframe and communicates with the host through the AppBridge. You define where your app appears using `menuItems` in the manifest, which adds entries to the ERP sidebar under **App** menu item.
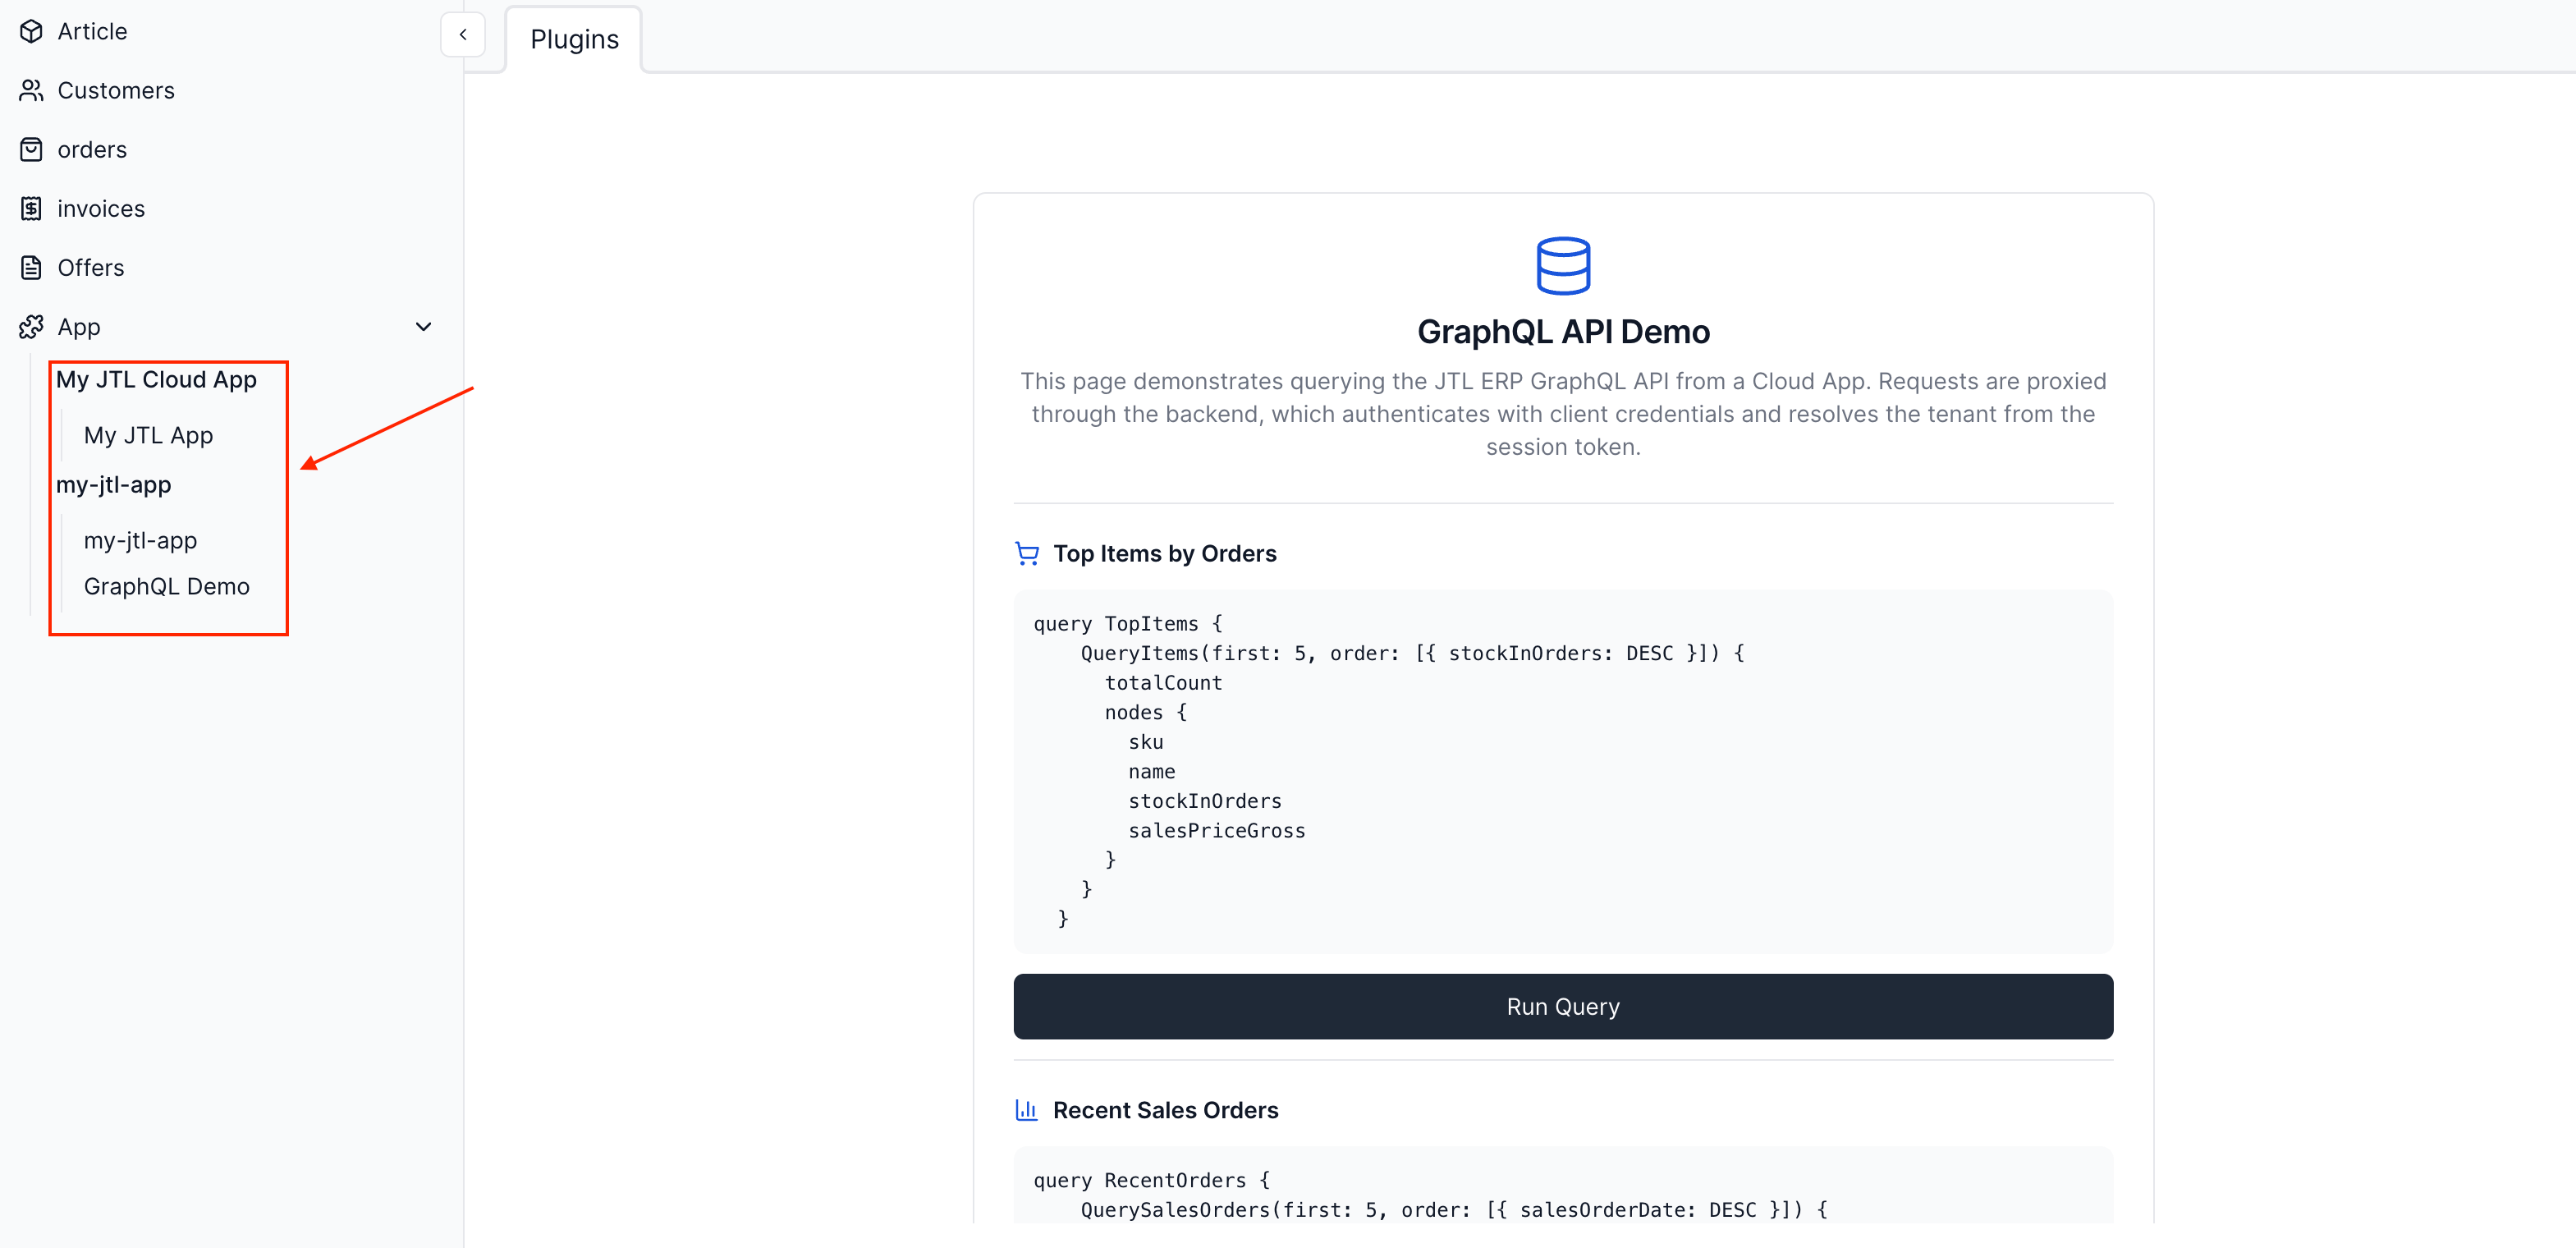 This is the most common integration type for apps that require a rich, interactive UI within the merchant’s ERP workspace.
```json theme={null}
{
"capabilities": {
"erp": {
"menuItems": [
{
"id": "my-jtl-app",
"name": "my-jtl-app",
"url": "https://your-app.example.com/erp"
},
{
"id": "my-jtl-graphql-demo",
"name": "GraphQL Demo",
"url": "https://your-app.example.com/graphql-demo"
}
]
}
}
}
```
**Example:** An app that fetches product details from the ERP, sends them to
an external AI service to generate descriptions, and lets the merchant push
the result back to the product field with a button click.
### Panel
A Panel app renders as a resizable sidebar on the right side of the ERP
content area. Like ERP-iFrame apps, Panels have full access to the AppBridge. The
difference is purely UI placement: Panels appear alongside existing ERP views
rather than replacing them.
This is the most common integration type for apps that require a rich, interactive UI within the merchant’s ERP workspace.
```json theme={null}
{
"capabilities": {
"erp": {
"menuItems": [
{
"id": "my-jtl-app",
"name": "my-jtl-app",
"url": "https://your-app.example.com/erp"
},
{
"id": "my-jtl-graphql-demo",
"name": "GraphQL Demo",
"url": "https://your-app.example.com/graphql-demo"
}
]
}
}
}
```
**Example:** An app that fetches product details from the ERP, sends them to
an external AI service to generate descriptions, and lets the merchant push
the result back to the product field with a button click.
### Panel
A Panel app renders as a resizable sidebar on the right side of the ERP
content area. Like ERP-iFrame apps, Panels have full access to the AppBridge. The
difference is purely UI placement: Panels appear alongside existing ERP views
rather than replacing them.
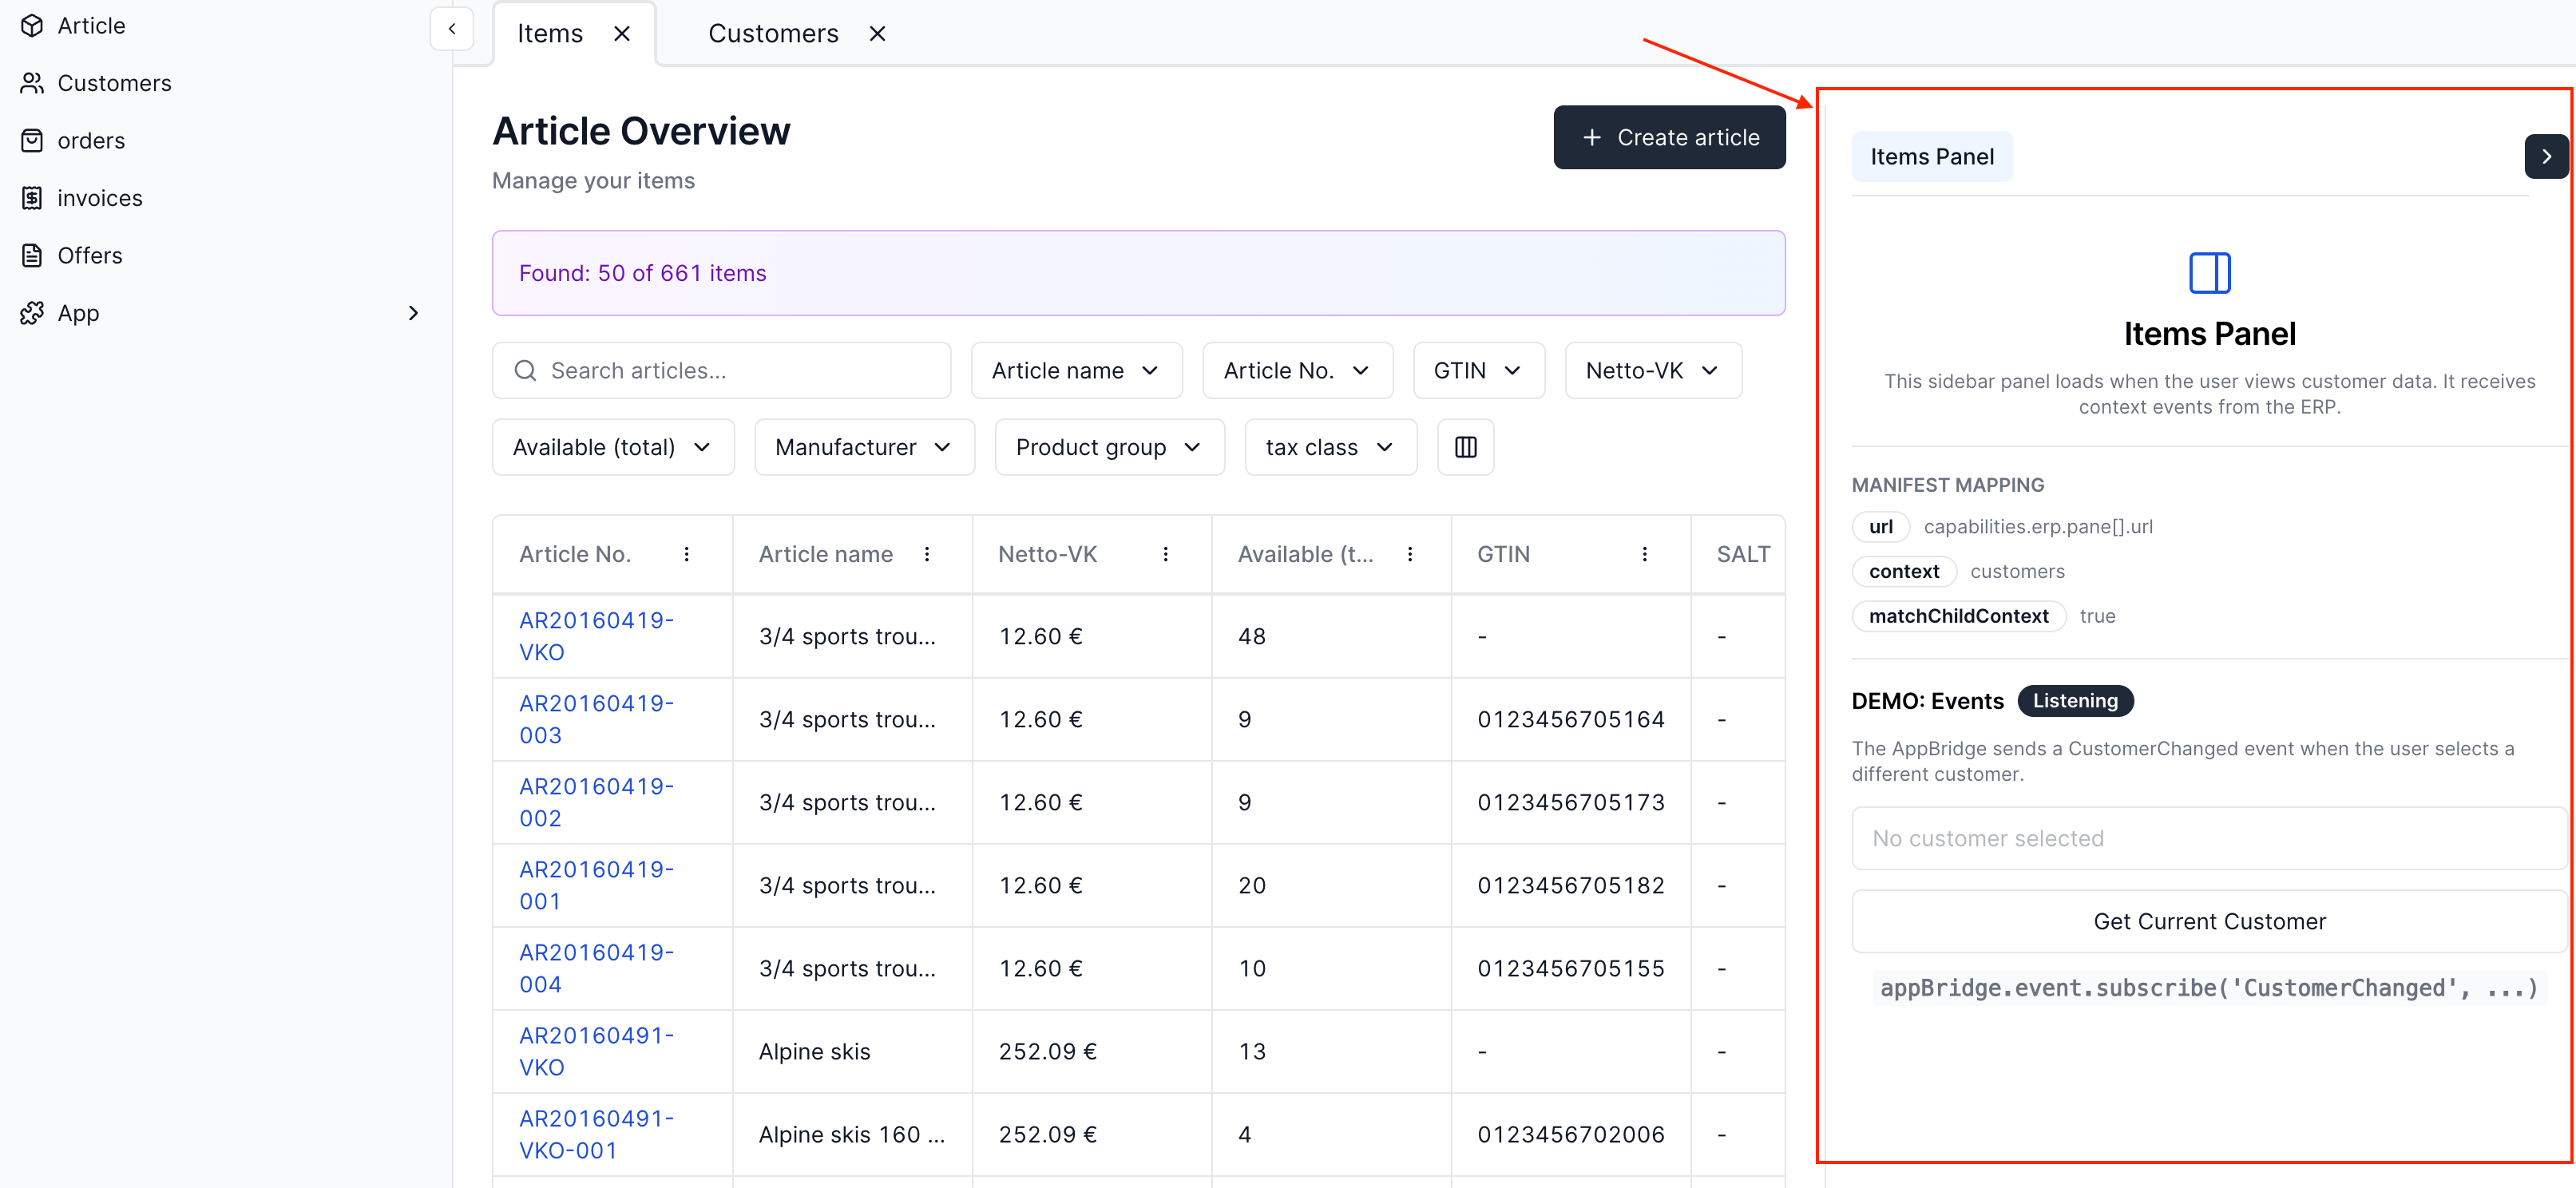 The panel remembers its state across the session. Its open or closed position and the selected app persist as the merchant navigates between views and across sign-ins, so a merchant who opens your app on one view finds it open on the next. The merchant can drag the panel edge to resize its width, and the last width is remembered.
When more than one installed app targets the same view, each app appears as its
own tab within the panel. The merchant switches between apps by selecting a tab.
When there are more tabs than fit the panel width, the overflow collapses into a
menu at the end of the tab bar.
The panel remembers its state across the session. Its open or closed position and the selected app persist as the merchant navigates between views and across sign-ins, so a merchant who opens your app on one view finds it open on the next. The merchant can drag the panel edge to resize its width, and the last width is remembered.
When more than one installed app targets the same view, each app appears as its
own tab within the panel. The merchant switches between apps by selecting a tab.
When there are more tabs than fit the panel width, the overflow collapses into a
menu at the end of the tab bar.
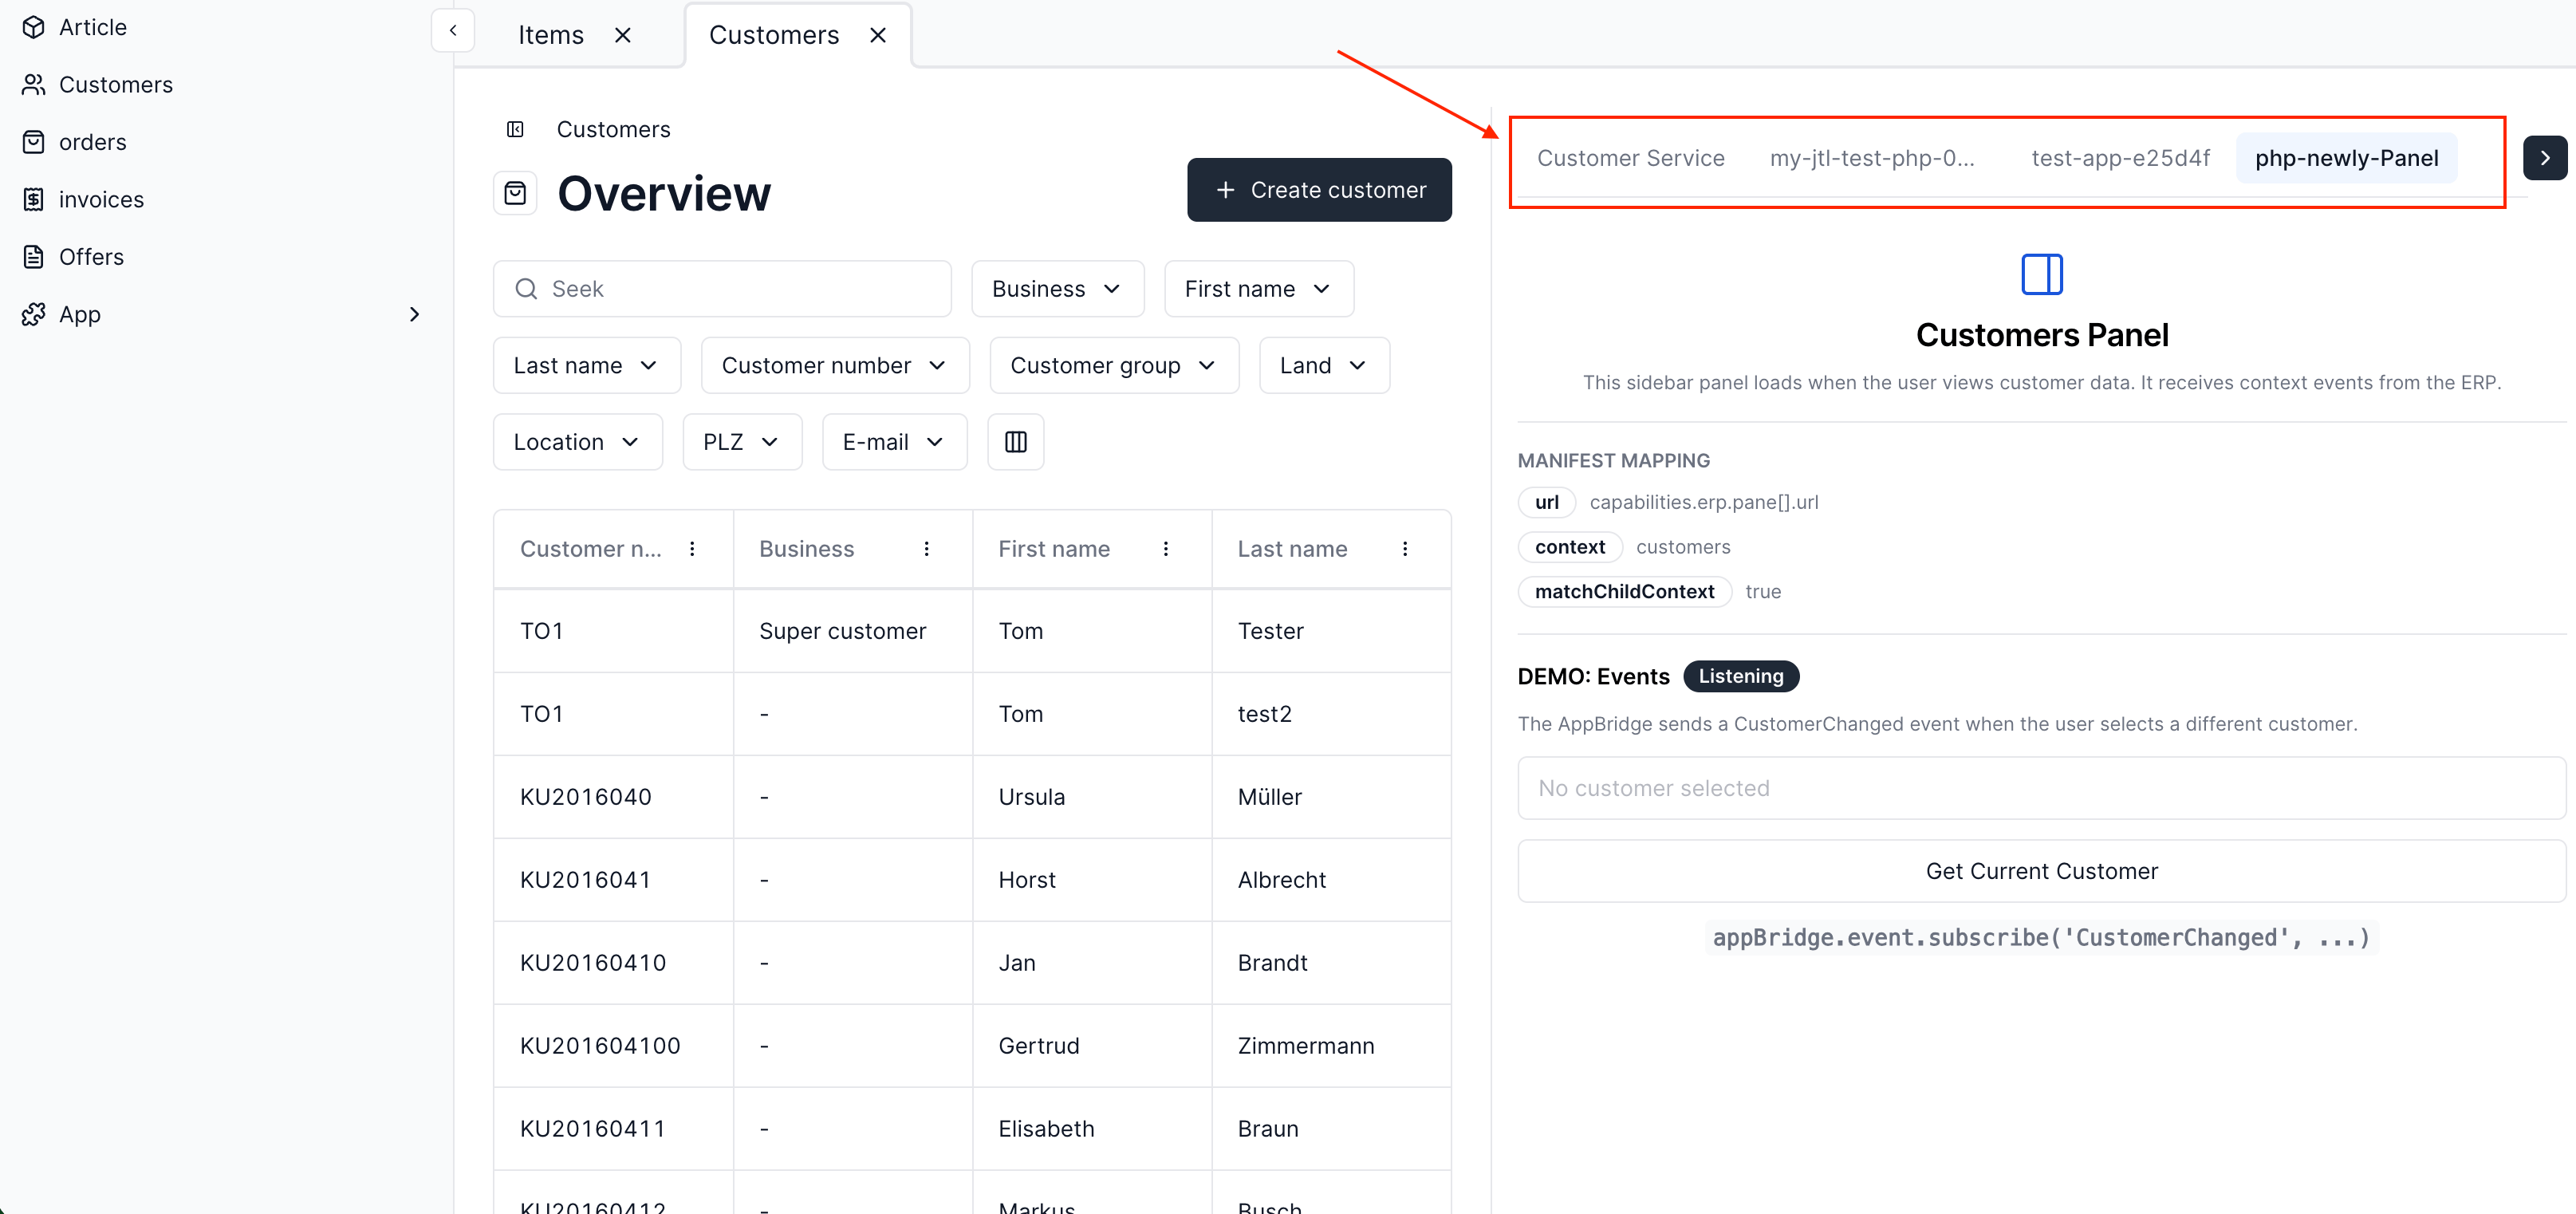 Panels are context-aware. You specify which ERP view your panel appears in using the `context` field.
```json theme={null}
{
"capabilities": {
"erp": {
"pane": [
{
"id": "customer-panel",
"url": "https://your-app.example.com/pane/customers",
"context": "$tenantSlug.customers"
}
]
}
}
}
```
The `context` field uses a special syntax to refer to specific views in the ERP Cloud. The `$tenantSlug` refers to the current tenant, and the following text is the name of the view. For example, `$tenantSlug.customers` refers to the **Customers** view in the current tenant's ERP.
Panels are context-aware. You specify which ERP view your panel appears in using the `context` field.
```json theme={null}
{
"capabilities": {
"erp": {
"pane": [
{
"id": "customer-panel",
"url": "https://your-app.example.com/pane/customers",
"context": "$tenantSlug.customers"
}
]
}
}
}
```
The `context` field uses a special syntax to refer to specific views in the ERP Cloud. The `$tenantSlug` refers to the current tenant, and the following text is the name of the view. For example, `$tenantSlug.customers` refers to the **Customers** view in the current tenant's ERP.
 **Example:** A sidebar panel that reacts to the merchant navigating between customers, displaying real-time analytics or notes for the currently selected customer.
## App Installation Flow
Merchants discover and install apps from the [App Store](https://apps.jtl-cloud.com/). The installation process grants your app the permissions it needs to access the merchant's data.
```mermaid theme={null}
flowchart TD
A["Browse App Store"] --> B["Select App"]
B --> C["View Details and Click Install"]
C --> D["Permissions Granted Automatically"]
D --> E["App Active"]
E --> F["Merchant Uses App"]
style A fill:#EEEEE7,stroke:#0B1B45,stroke-width:2px,color:#0B1B45
style E fill:#FFF2EB,stroke:#FB581F,stroke-width:2px,color:#0B1B45
style F fill:#FFF2EB,stroke:#FB581F,stroke-width:2px,color:#0B1B45
```
The merchant browses the [App Store](https://apps.jtl-cloud.com/) and selects an app.
On the app's detail page, the merchant reviews the description, screenshots, and required permissions, then clicks **Install**.
The platform grants your app the scopes declared in your manifest. This happens automatically as part of the installation. The merchant does not need to approve individual scopes in a separate consent screen.
The app is now active in the merchant's environment. Depending on the integration type, it appears as a Hub card, ERP menu item, or sidebar panel.
## Authentication Flows
Every Cloud App gets an OAuth client with a `ClientId` and `ClientSecret` when registered in the [Partner Portal](https://partner.jtl-cloud.com/). When a merchant installs your app, it receives access to that merchant's tenant without the credentials changing. One set of credentials works across all tenants that install your app.
### Machine-to-Machine (M2M)
Use this flow when your backend needs to call JTL Cloud APIs without any user interaction. Your backend authenticates directly with the Identity Provider using client credentials.
```mermaid theme={null}
sequenceDiagram
autonumber
participant BE as App Backend
participant IDP as JTL Identity Provider
participant API as JTL Cloud API
BE->>IDP: Request access token (client credentials)
activate IDP
IDP-->>BE: Return access token (JWT)
deactivate IDP
BE->>API: Call API with access token + tenant ID
activate API
API-->>BE: Return response
deactivate API
```
1. Your backend sends its `ClientId` and `ClientSecret` to the Identity Provider.
2. The Identity Provider validates the credentials and returns a JWT access token.
3. Your backend uses the token (along with the `X-Tenant-ID` header) to call the JTL Cloud API.
4. The API processes the request and returns the data.
### Frontend-Initiated
Use this flow when your app has a frontend running in an iframe. The frontend gets a session token from the AppBridge, passes it to your backend, and the backend handles both session validation and API authentication.
```mermaid theme={null}
sequenceDiagram
autonumber
participant FE as App Frontend
participant AB as JTL AppBridge
participant BE as App Backend
participant IDP as JTL Identity Provider
participant ACC as JTL Account Service
participant API as JTL Cloud API
FE->>AB: Request session token
AB-->>FE: Return session token
FE->>BE: Request data (with session token)
par Backend authentication
BE->>IDP: Request access token (client credentials)
IDP-->>BE: Return access token
and Session validation
BE->>ACC: Validate session token (JWKS)
ACC-->>BE: Session valid (tenant info)
end
BE->>API: Call API (access token + tenant ID)
API-->>BE: Return data
BE-->>FE: Forward response
```
The frontend requests a session token from the AppBridge. This token contains the current user's identity and tenant information.
The frontend sends its request to your backend, including the session token.
Your backend does two things in parallel: requests an access token from the Identity Provider (client credentials), and validates the session token against JTL's Account Service using JWKS.
With a valid access token and confirmed tenant, your backend calls the JTL Cloud API and returns the response to the frontend.
## What's Next
Learn how the AppBridge, iframe messaging, and Platform UI components work.
Implement OAuth 2.0 and session token flows in your app.
Call the JTL Cloud and JTL-Wawi APIs from your backend with proper headers and scoping.
**Example:** A sidebar panel that reacts to the merchant navigating between customers, displaying real-time analytics or notes for the currently selected customer.
## App Installation Flow
Merchants discover and install apps from the [App Store](https://apps.jtl-cloud.com/). The installation process grants your app the permissions it needs to access the merchant's data.
```mermaid theme={null}
flowchart TD
A["Browse App Store"] --> B["Select App"]
B --> C["View Details and Click Install"]
C --> D["Permissions Granted Automatically"]
D --> E["App Active"]
E --> F["Merchant Uses App"]
style A fill:#EEEEE7,stroke:#0B1B45,stroke-width:2px,color:#0B1B45
style E fill:#FFF2EB,stroke:#FB581F,stroke-width:2px,color:#0B1B45
style F fill:#FFF2EB,stroke:#FB581F,stroke-width:2px,color:#0B1B45
```
The merchant browses the [App Store](https://apps.jtl-cloud.com/) and selects an app.
On the app's detail page, the merchant reviews the description, screenshots, and required permissions, then clicks **Install**.
The platform grants your app the scopes declared in your manifest. This happens automatically as part of the installation. The merchant does not need to approve individual scopes in a separate consent screen.
The app is now active in the merchant's environment. Depending on the integration type, it appears as a Hub card, ERP menu item, or sidebar panel.
## Authentication Flows
Every Cloud App gets an OAuth client with a `ClientId` and `ClientSecret` when registered in the [Partner Portal](https://partner.jtl-cloud.com/). When a merchant installs your app, it receives access to that merchant's tenant without the credentials changing. One set of credentials works across all tenants that install your app.
### Machine-to-Machine (M2M)
Use this flow when your backend needs to call JTL Cloud APIs without any user interaction. Your backend authenticates directly with the Identity Provider using client credentials.
```mermaid theme={null}
sequenceDiagram
autonumber
participant BE as App Backend
participant IDP as JTL Identity Provider
participant API as JTL Cloud API
BE->>IDP: Request access token (client credentials)
activate IDP
IDP-->>BE: Return access token (JWT)
deactivate IDP
BE->>API: Call API with access token + tenant ID
activate API
API-->>BE: Return response
deactivate API
```
1. Your backend sends its `ClientId` and `ClientSecret` to the Identity Provider.
2. The Identity Provider validates the credentials and returns a JWT access token.
3. Your backend uses the token (along with the `X-Tenant-ID` header) to call the JTL Cloud API.
4. The API processes the request and returns the data.
### Frontend-Initiated
Use this flow when your app has a frontend running in an iframe. The frontend gets a session token from the AppBridge, passes it to your backend, and the backend handles both session validation and API authentication.
```mermaid theme={null}
sequenceDiagram
autonumber
participant FE as App Frontend
participant AB as JTL AppBridge
participant BE as App Backend
participant IDP as JTL Identity Provider
participant ACC as JTL Account Service
participant API as JTL Cloud API
FE->>AB: Request session token
AB-->>FE: Return session token
FE->>BE: Request data (with session token)
par Backend authentication
BE->>IDP: Request access token (client credentials)
IDP-->>BE: Return access token
and Session validation
BE->>ACC: Validate session token (JWKS)
ACC-->>BE: Session valid (tenant info)
end
BE->>API: Call API (access token + tenant ID)
API-->>BE: Return data
BE-->>FE: Forward response
```
The frontend requests a session token from the AppBridge. This token contains the current user's identity and tenant information.
The frontend sends its request to your backend, including the session token.
Your backend does two things in parallel: requests an access token from the Identity Provider (client credentials), and validates the session token against JTL's Account Service using JWKS.
With a valid access token and confirmed tenant, your backend calls the JTL Cloud API and returns the response to the frontend.
## What's Next
Learn how the AppBridge, iframe messaging, and Platform UI components work.
Implement OAuth 2.0 and session token flows in your app.
Call the JTL Cloud and JTL-Wawi APIs from your backend with proper headers and scoping.