> ## Documentation Index
> Fetch the complete documentation index at: https://developer.jtl-software.com/llms.txt
> Use this file to discover all available pages before exploring further.
# Connect and Fetch Data
> Register your app with JTL, install it in the JTL Hub, and fetch real product data from JTL-Wawi.
Bring everything together. Register your app with JTL to get real credentials, install it in the JTL Hub, then add an items endpoint to your backend and a product table to your frontend.
## Prerequisites
You need:
* ✅ **A finished frontend** from the [Build the Frontend](/get-started/quick-start/from-scratch/frontend) guide
* ✅ **A finished backend** from either the [Node.js](/get-started/quick-start/from-scratch/backend-node), [C#](/get-started/quick-start/from-scratch/backend-csharp), or [PHP](/get-started/quick-start/from-scratch/backend-php) guide
* ✅ **A JTL ID** (your login to the JTL ecosystem)
* ✅ **Access to an organization (tenant) in the [Partner Portal](https://partner.jtl-cloud.com)** (created automatically on first login if you don’t have one yet)
* ✅ **[JTL-Wawi](https://www.jtl-software.com/de/warenwirtschaftssystem-software/jtl-wawi-download)** installed and running locally, with at least one product, and connected to JTL Cloud.
If you don’t have JTL Cloud set up yet, follow the step-by-step guide: [Create a Developer Account](/get-started/create-developer-account).
## What you're Building
So far, the frontend and backend are only loosely connected. The frontend can render the app, and the backend can verify authentication tokens, but neither side is yet tied to a real merchant installation. This guide closes the loop.
```mermaid theme={null}
sequenceDiagram
participant Dev as You
participant Portal as Partner Portal
participant Hub as JTL Hub
participant App as Your App
participant Wawi as JTL-Wawi
Dev->>Portal: Register app with manifest
Portal-->>Dev: Client ID + Client Secret
Dev->>Hub: Install app in test tenant
Hub->>App: Loads /setup in iframe
App->>App: Verifies session, completes handshake
Dev->>App: Opens /erp menu item
App->>Wawi: GET /api/items (with session token)
Wawi-->>App: Product data
```
By the end, opening the app from the ERP Cloud menu will show a table of real products from JTL-Wawi.
## 1. Create the Manifest
The manifest tells JTL three things: how your app integrates technically, how it appears in the App Store, and where to send merchants when they install or open it.
Create `manifest.json` in the project root:
```json theme={null}
{
"manifest": {
"version": "1.0.0",
"technicalName": "my-jtl-app",
"lifecycle": {
"configurationUrl": "http://localhost:5173/setup"
},
"capabilities": {
"hub": {
"appLauncher": {
"redirectUrl": "http://localhost:5173/hub"
}
},
"erp": {
"menuItems": [
{
"id": "my-app-menu",
"name": "My JTL App",
"url": "http://localhost:5173/erp"
}
],
"api": {
"scopes": []
}
}
}
},
"listing": {
"version": "1.0.0",
"defaultLocale": "en",
"name": {
"en": {
"short": "my-jtl-app",
"full": "My JTL Cloud App"
}
},
"description": {
"en": {
"short": "A Cloud App built from scratch",
"full": "A sample Cloud App built from scratch using Vite, React, and TypeScript."
}
},
"media": {
"icons": {
"light": "https://hub.jtl-cloud.com/assets/image-placeholder.png",
"dark": "https://hub.jtl-cloud.com/assets/image-placeholder.png"
}
},
"support": {
"url": {
"en": "https://support.example.com/help"
}
},
"legal": {
"privacyPolicy": "https://example.com/privacy",
"termsOfUse": "https://example.com/terms",
"gdpr": {
"request": "https://example.com/gdpr/request",
"delete": "https://example.com/gdpr/delete"
}
}
}
}
```
The three URLs under `capabilities` map directly to the three frontend routes:
| Manifest field | Page in your code |
| --------------------------------------------------- | ------------------ |
| `manifest.lifecycle.configurationUrl` | `_shell.setup.tsx` |
| `manifest.capabilities.hub.appLauncher.redirectUrl` | `hub.tsx` |
| `manifest.capabilities.erp.menuItems[].url` | `_shell.erp.tsx` |
The example uses `http://localhost:5173/...` for the manifest URLs and `https://example.com/...` for the listing URLs. When you deploy, replace both with your real production domain. All URLs must be publicly reachable. `localhost` works only because the JTL App Shell runs in your browser, not on JTL's servers.
## 2. Register your App
Go to [Partner Portal](https://partner.jtl-cloud.com/) and log in.
Click **+ Create**. You'll see a manifest editor with a pre-filled example.
Replace the example manifest with the contents of your `manifest.json` file. Click **Register app**.
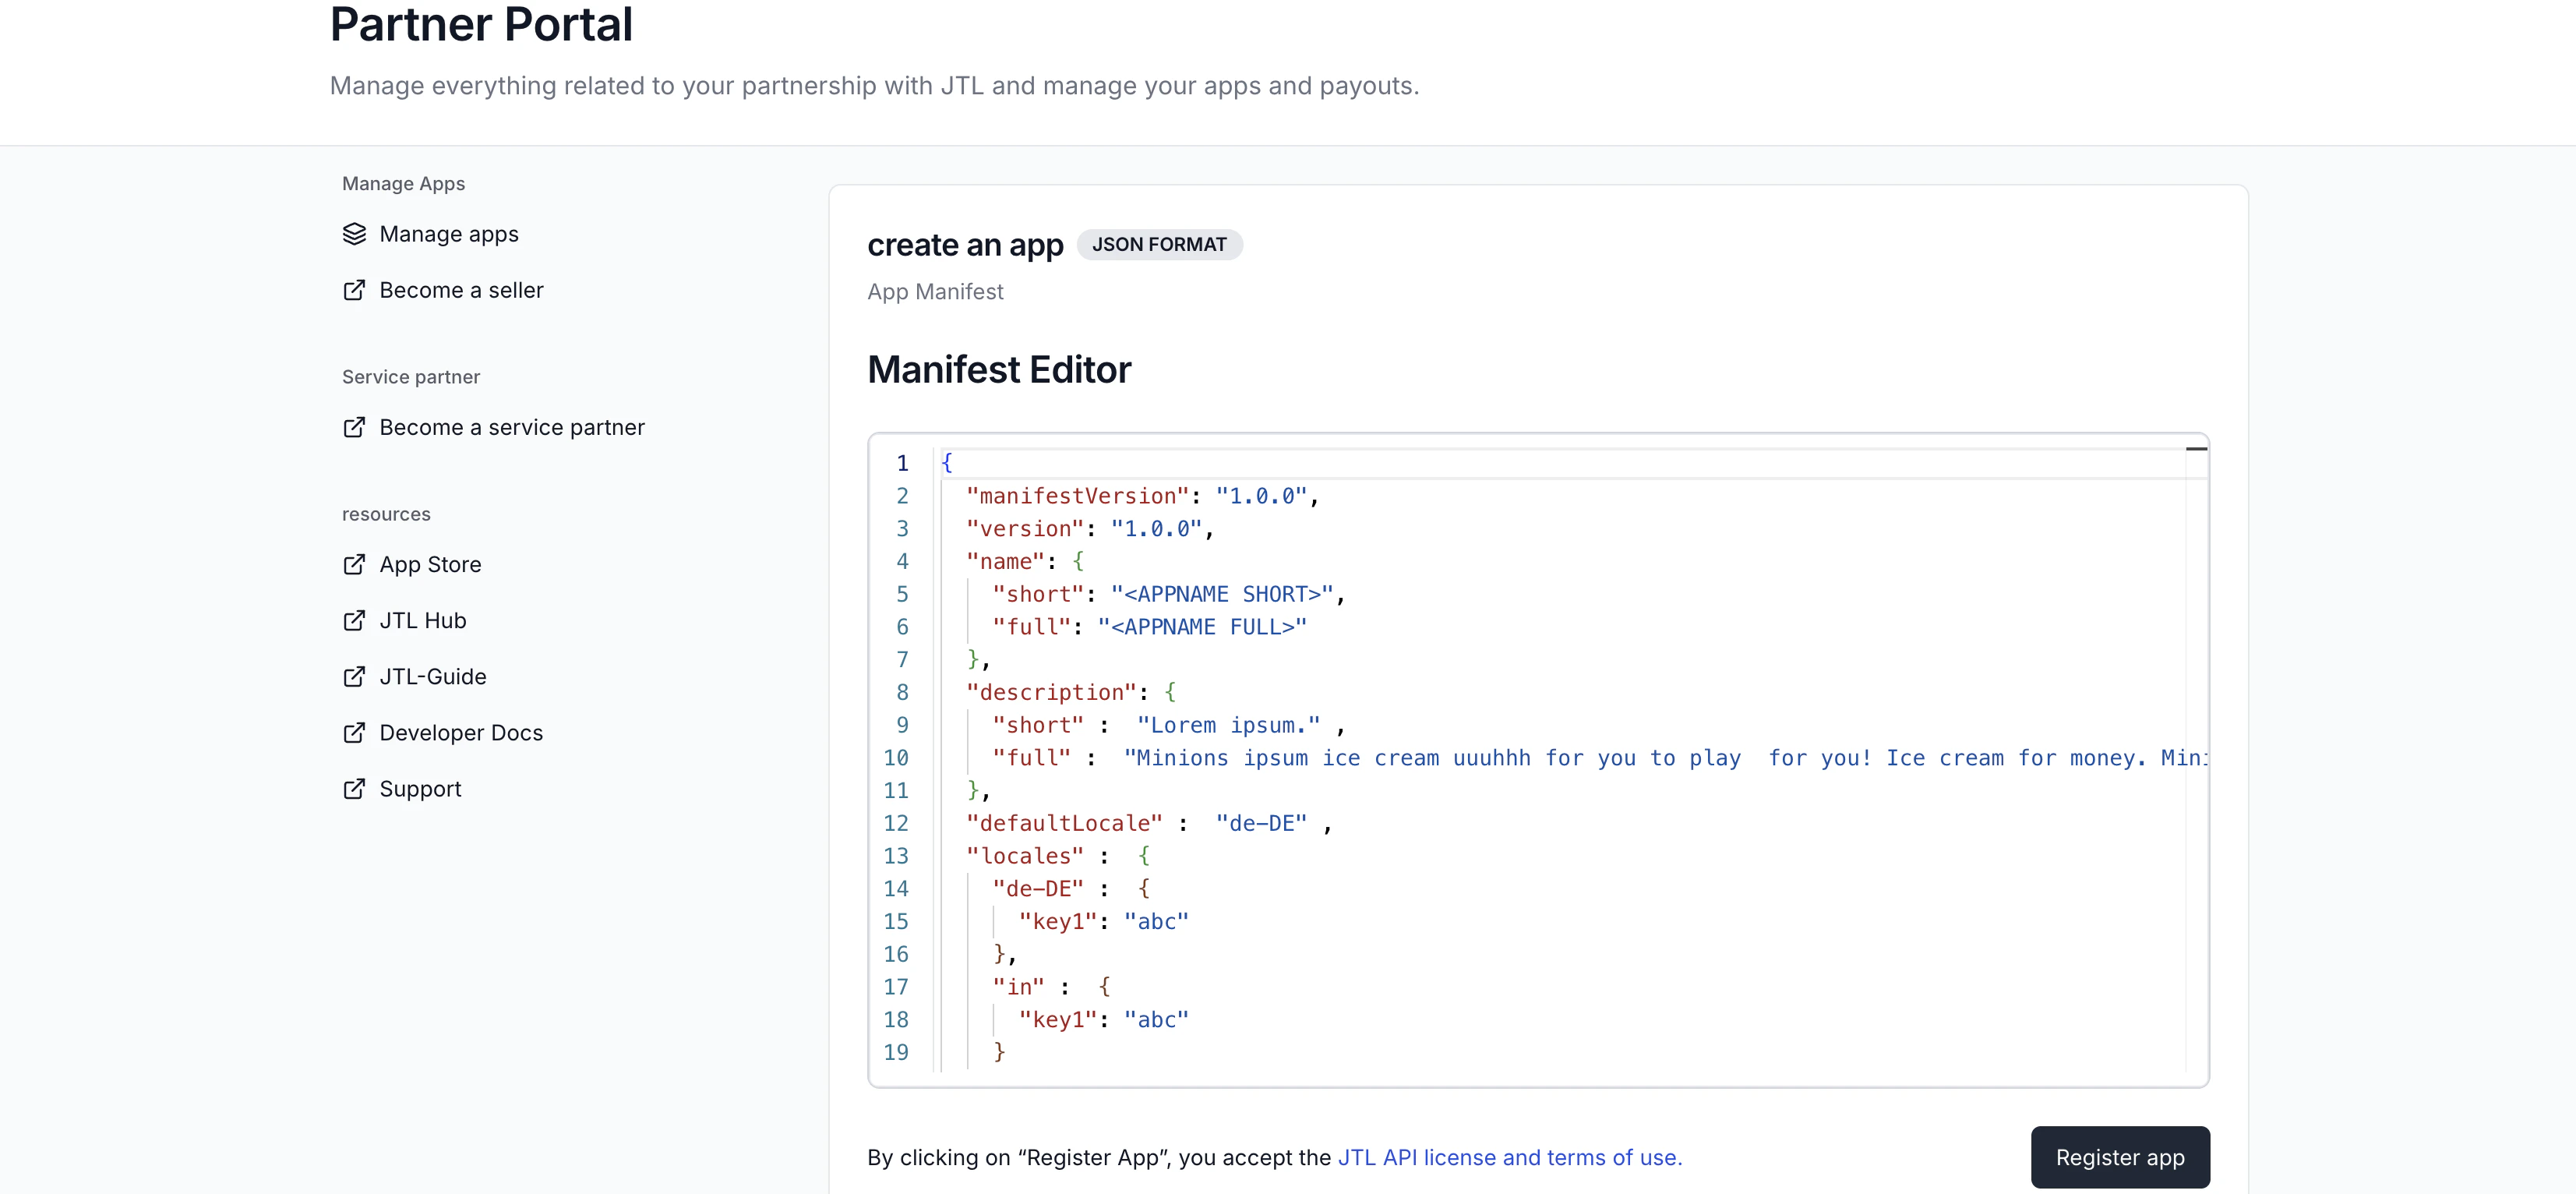 After registration, you'll see your **Client ID** and **Client Secret**.
The Client Secret is shown only once. Copy the value immediately. If you lose it, you'll need to register a new app.
## 3. Update your Backend Credentials
Replace the placeholder values you set earlier with the real Client ID and Client Secret.
Open `backend/.env` and replace the placeholder values:
```dotenv theme={null}
CLIENT_ID=your-actual-client-id
CLIENT_SECRET=your-actual-client-secret
PORT=5273
```
The `tsx watch` command picks up source file changes automatically, but environment variables are read once at startup. Stop and restart the backend to pick up the new values.
From the `Backend/` directory, update the user-secrets values:
```bash theme={null}
dotnet user-secrets set "Jtl:ClientId" "your-actual-client-id"
dotnet user-secrets set "Jtl:ClientSecret" "your-actual-client-secret"
```
ASP.NET Core reads configuration once at startup. Stop and restart the backend to pick up the new values.
Open `backend/.env` and replace the placeholder values:
```dotenv theme={null}
CLIENT_ID=your-actual-client-id
CLIENT_SECRET=your-actual-client-secret
PORT=5273
```
PHP's built-in development server reads environment variables once at startup. Stop the server with `Ctrl+C` and start it again to pick up the new values:
## 4. Run Both Processes
You need both the frontend and backend running. Open two terminals from the project root.
**Terminal 1 (backend):**
```bash theme={null}
cd backend
npm run dev
```
```bash theme={null}
cd Backend
dotnet run
```
```bash theme={null}
cd backend
php -S localhost:5273 -t public
```
**Terminal 2 (frontend):**
```bash theme={null}
cd frontend
npm run dev
```
Opening `http://localhost:5173` directly in a browser will show a blank page or the placeholder error state. The app is meant to be rendered inside the JTL App Shell, which is what the next step covers.
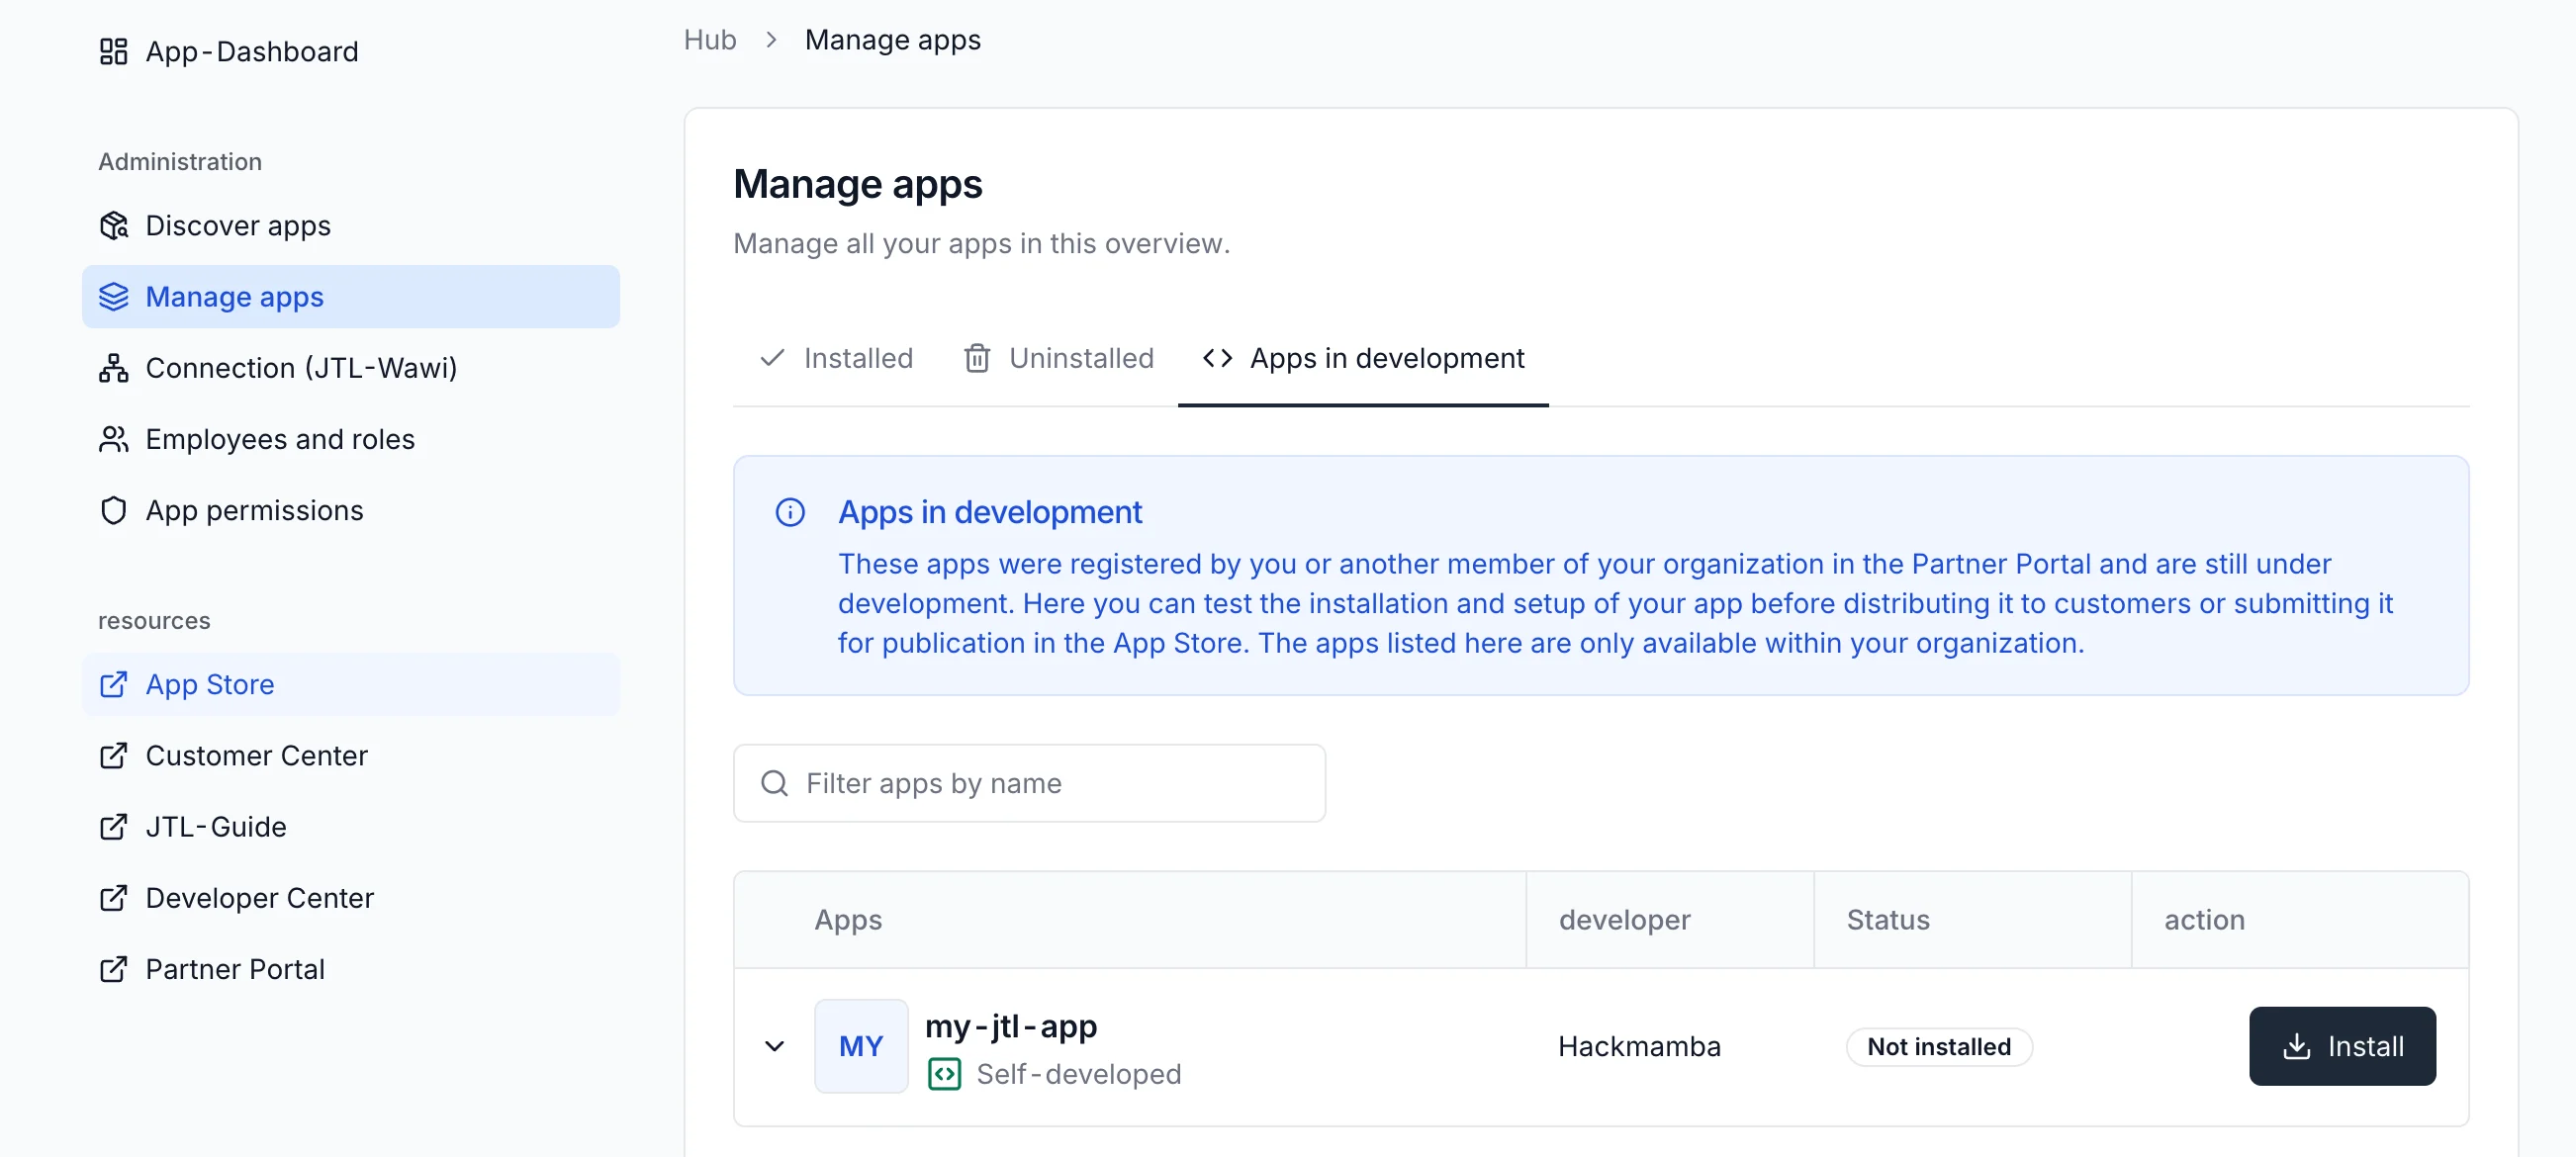
## 5. Install the App in JTL Hub
Go to [JTL Hub](https://hub.jtl-cloud.com/) and log in.
Navigate to the **Manage apps** menu and click the **Apps in development** tab. You should see your newly registered app.
After registration, you'll see your **Client ID** and **Client Secret**.
The Client Secret is shown only once. Copy the value immediately. If you lose it, you'll need to register a new app.
## 3. Update your Backend Credentials
Replace the placeholder values you set earlier with the real Client ID and Client Secret.
Open `backend/.env` and replace the placeholder values:
```dotenv theme={null}
CLIENT_ID=your-actual-client-id
CLIENT_SECRET=your-actual-client-secret
PORT=5273
```
The `tsx watch` command picks up source file changes automatically, but environment variables are read once at startup. Stop and restart the backend to pick up the new values.
From the `Backend/` directory, update the user-secrets values:
```bash theme={null}
dotnet user-secrets set "Jtl:ClientId" "your-actual-client-id"
dotnet user-secrets set "Jtl:ClientSecret" "your-actual-client-secret"
```
ASP.NET Core reads configuration once at startup. Stop and restart the backend to pick up the new values.
Open `backend/.env` and replace the placeholder values:
```dotenv theme={null}
CLIENT_ID=your-actual-client-id
CLIENT_SECRET=your-actual-client-secret
PORT=5273
```
PHP's built-in development server reads environment variables once at startup. Stop the server with `Ctrl+C` and start it again to pick up the new values:
## 4. Run Both Processes
You need both the frontend and backend running. Open two terminals from the project root.
**Terminal 1 (backend):**
```bash theme={null}
cd backend
npm run dev
```
```bash theme={null}
cd Backend
dotnet run
```
```bash theme={null}
cd backend
php -S localhost:5273 -t public
```
**Terminal 2 (frontend):**
```bash theme={null}
cd frontend
npm run dev
```
Opening `http://localhost:5173` directly in a browser will show a blank page or the placeholder error state. The app is meant to be rendered inside the JTL App Shell, which is what the next step covers.
## 5. Install the App in JTL Hub
Go to [JTL Hub](https://hub.jtl-cloud.com/) and log in.
Navigate to the **Manage apps** menu and click the **Apps in development** tab. You should see your newly registered app.
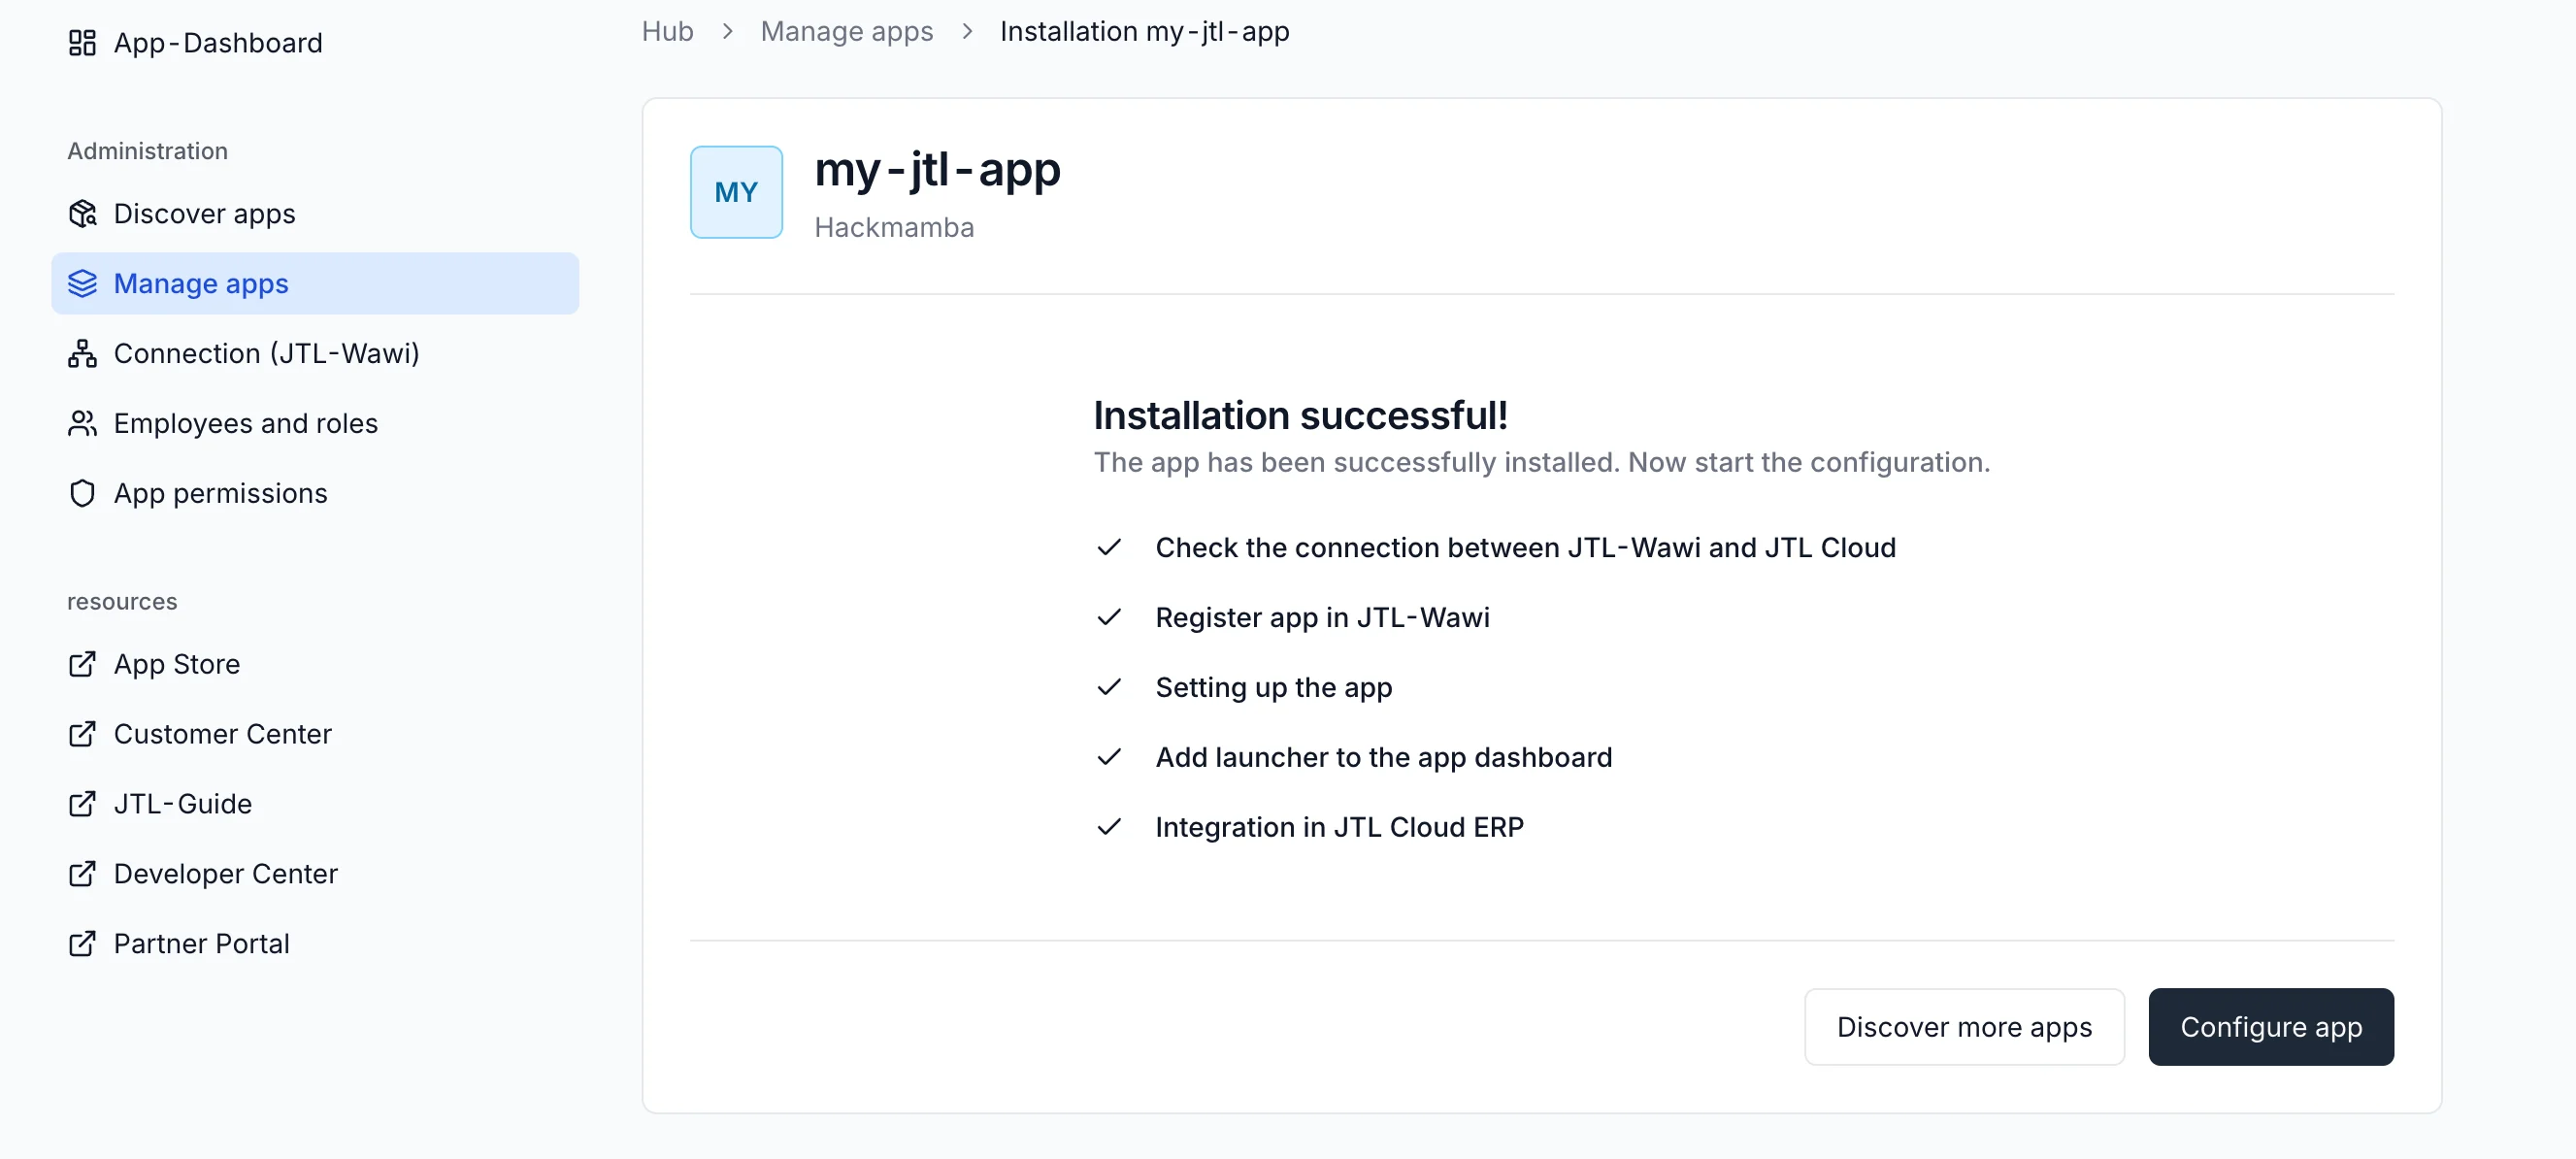
 Once the app is installed, you'll see a success screen with the option to configure the app. Click the **Configure app** button to proceed to the next step.
 Click the **Complete Setup** button on your setup page. This triggers the full setup handshake between your app and JTL.
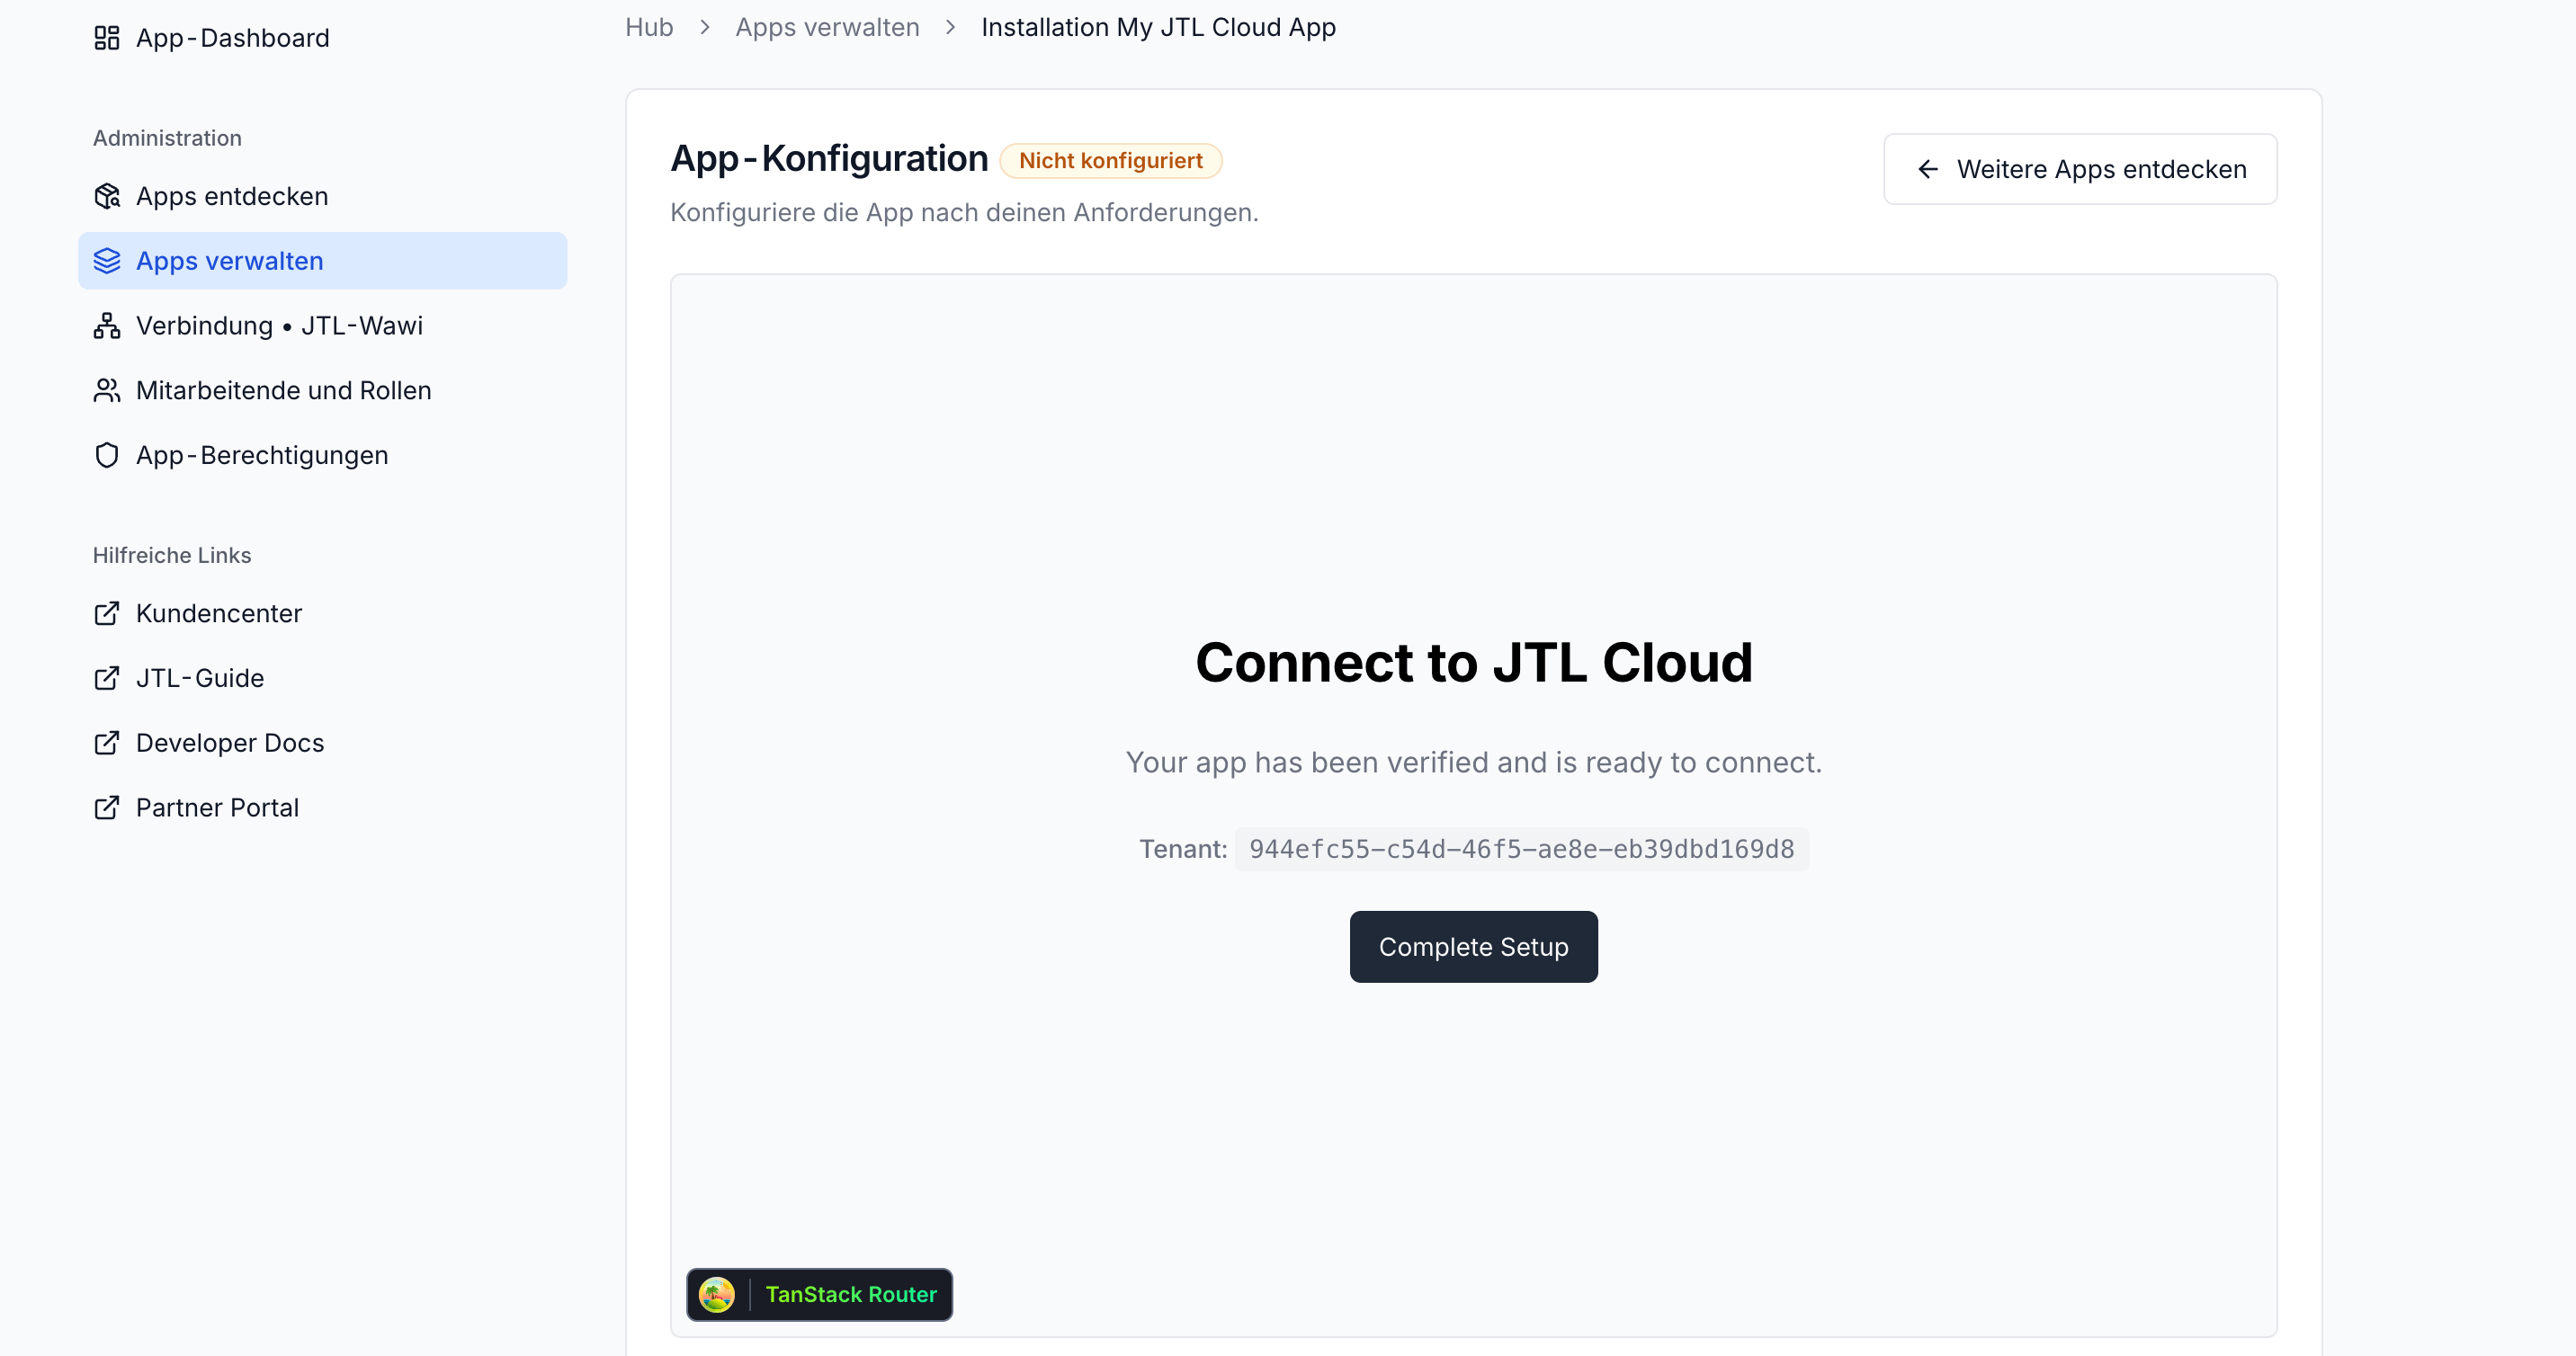 The setup page now displays a valid tenant ID. This confirms that the session token was successfully verified through your backend and that the App Shell recognizes the installation as complete.
## 6. Add an Items Endpoint
The backend can now make tenant-scoped calls to the JTL Cloud API. The next step is adding an endpoint that fetches products from JTL-Wawi via GraphQL.
Every API request that needs to access tenant data needs an `X-Tenant-ID` header. The backend extracts this value from the verified session token payload. See the [Session Token Payload](/guides/essentials/authentication/api-keys-tokens#payload) reference for details.
Add the items route to `backend/src/server.ts`. Place it alongside the existing `connect-tenant` route:
```typescript theme={null}
import { getJwt } from './jtl-auth.js';
app.get('/api/items', async (req: Request, res: Response) => {
const authHeader = req.header('authorization');
if (!authHeader?.startsWith('Bearer ')) {
return res.status(401).json({ error: 'Missing or invalid Authorization header' });
}
const sessionToken = authHeader.slice(7);
try {
const payload = await verifySessionToken(sessionToken);
const accessToken = await getJwt();
const response = await fetch('https://api.jtl-cloud.com/erp/v2/graphql', {
method: 'POST',
headers: {
'Content-Type': 'application/json',
Authorization: `Bearer ${accessToken}`,
'X-Tenant-ID': payload.tenantId,
},
body: JSON.stringify({
operationName: 'GetERPItems',
query: `
query GetERPItems {
QueryItems(first: 10) {
nodes { id sku name notes basePriceUnit }
totalCount
}
}
`,
}),
});
const body = await response.json();
return res.json(body);
} catch (error) {
console.error('Failed to fetch items:', error);
return res.status(500).json({ error: 'Failed to fetch items' });
}
});
```
The route reads the session token from the `Authorization` header (sent by the frontend as a `Bearer` token), verifies it to extract the tenant ID, fetches a fresh access token, and forwards the GraphQL response back to the frontend as-is.
Create `Backend/Controllers/ItemsController.cs`:
```csharp theme={null}
using System.Net.Http.Headers;
using System.Text;
using Backend.Services;
using Microsoft.AspNetCore.Mvc;
namespace Backend.Controllers;
[ApiController]
[Route("api/items")]
public class ItemsController : ControllerBase
{
private readonly HttpClient _http;
private readonly JtlAuthService _auth;
private readonly SessionVerifier _verifier;
public ItemsController(
IHttpClientFactory httpFactory,
JtlAuthService auth,
SessionVerifier verifier)
{
_http = httpFactory.CreateClient();
_auth = auth;
_verifier = verifier;
}
[HttpGet]
public async Task Get()
{
var authHeader = Request.Headers.Authorization.ToString();
if (string.IsNullOrEmpty(authHeader) || !authHeader.StartsWith("Bearer "))
{
return Unauthorized(new { error = "Missing or invalid Authorization header" });
}
var sessionToken = authHeader.Substring("Bearer ".Length);
try
{
var payload = await _verifier.VerifyAsync(sessionToken);
var accessToken = await _auth.GetJwtAsync();
var query = """
{
"operationName": "GetERPItems",
"query": "query GetERPItems { QueryItems(first: 10) { nodes { id sku name notes basePriceUnit } totalCount } }"
}
""";
var request = new HttpRequestMessage(
HttpMethod.Post,
$"{_auth.ApiBaseUrl}/erp/v2/graphql");
request.Headers.Authorization = new AuthenticationHeaderValue("Bearer", accessToken);
request.Headers.Add("X-Tenant-ID", payload.TenantId);
request.Content = new StringContent(query, Encoding.UTF8, "application/json");
var response = await _http.SendAsync(request);
var body = await response.Content.ReadAsStringAsync();
return Content(body, "application/json");
}
catch (Exception ex)
{
return StatusCode(500, new { error = "Failed to fetch items", details = ex.Message });
}
}
}
```
The controller reads the session token from the `Authorization` header (sent by the frontend as a `Bearer` token), verifies it to extract the tenant ID, fetches a fresh access token, and forwards the GraphQL response back to the frontend as-is.
The existing `app.MapControllers()` call in `Program.cs` already discovers this controller, so no extra registration is needed.
Add the items route to `backend/public/index.php`. Place it alongside the existing `connect-tenant` route:
```php theme={null}
$app->get('/api/items', function (Request $request, Response $response) use ($auth, $verifier, $httpClient) {
$authHeader = $request->getHeaderLine('Authorization');
if (!str_starts_with($authHeader, 'Bearer ')) {
$response->getBody()->write(json_encode(['error' => 'Missing or invalid Authorization header']));
return $response->withStatus(401)->withHeader('Content-Type', 'application/json');
}
$sessionToken = substr($authHeader, 7);
try {
$payload = $verifier->verify($sessionToken);
$accessToken = $auth->getJwt();
$apiResponse = $httpClient->request('POST', JtlAuth::API_BASE_URL . '/erp/v2/graphql', [
'http_errors' => false,
'headers' => [
'Content-Type' => 'application/json',
'Accept' => 'application/json',
'Authorization' => "Bearer {$accessToken}",
'X-Tenant-ID' => $payload['tenantId'],
],
'json' => [
'operationName' => 'GetERPItems',
'query' => 'query GetERPItems { QueryItems(first: 10) { nodes { id sku name notes basePriceUnit } totalCount } }',
],
]);
$body = $apiResponse->getBody()->getContents();
$response->getBody()->write($body);
return $response->withHeader('Content-Type', 'application/json');
} catch (\Throwable $e) {
error_log("Failed to fetch items: {$e->getMessage()}");
$response->getBody()->write(json_encode(['error' => 'Failed to fetch items']));
return $response->withStatus(500)->withHeader('Content-Type', 'application/json');
}
});
```
The route reads the session token from the `Authorization` header (sent by the frontend as a `Bearer` token), verifies it to extract the tenant ID, fetches a fresh access token, and forwards the GraphQL response back to the frontend as-is.
## 7. Display Items in the ERP Page
Replace `frontend/src/routes/_shell.erp.tsx` with a version that fetches and renders the products:
```tsx theme={null}
import { createFileRoute } from '@tanstack/react-router';
import { Box, Text } from '@jtl-software/platform-ui-react';
import { useCallback, useEffect, useState } from 'react';
import { useAppBridge } from '../appBridge';
interface Item {
id: string;
sku: string;
name: string;
}
interface ItemsResponse {
data: {
QueryItems: {
nodes: Item[];
totalCount: number;
};
};
}
function ErpPage() {
const { appBridge, tenantId } = useAppBridge();
const [items, setItems] = useState([]);
const [totalCount, setTotalCount] = useState(0);
const [loading, setLoading] = useState(false);
const [error, setError] = useState(null);
const fetchItems = useCallback(async () => {
if (!appBridge) return;
try {
setLoading(true);
const sessionToken =
await appBridge.method.call('getSessionToken');
const res = await fetch('/api/items', {
headers: { Authorization: `Bearer ${sessionToken}` },
});
if (!res.ok) {
throw new Error(`Request failed (${res.status})`);
}
const data: ItemsResponse = await res.json();
setItems(data.data.QueryItems.nodes || []);
setTotalCount(data.data.QueryItems.totalCount || 0);
} catch (err) {
console.error(String(err));
setError(
err instanceof Error ? err.message : 'Failed to load products',
);
} finally {
setLoading(false);
}
}, [appBridge]);
useEffect(() => {
fetchItems();
}, [fetchItems]);
if (error) {
return (
Error
{error}
);
}
return (
My JTL Cloud App
Connected to tenant:{' '}
The setup page now displays a valid tenant ID. This confirms that the session token was successfully verified through your backend and that the App Shell recognizes the installation as complete.
## 6. Add an Items Endpoint
The backend can now make tenant-scoped calls to the JTL Cloud API. The next step is adding an endpoint that fetches products from JTL-Wawi via GraphQL.
Every API request that needs to access tenant data needs an `X-Tenant-ID` header. The backend extracts this value from the verified session token payload. See the [Session Token Payload](/guides/essentials/authentication/api-keys-tokens#payload) reference for details.
Add the items route to `backend/src/server.ts`. Place it alongside the existing `connect-tenant` route:
```typescript theme={null}
import { getJwt } from './jtl-auth.js';
app.get('/api/items', async (req: Request, res: Response) => {
const authHeader = req.header('authorization');
if (!authHeader?.startsWith('Bearer ')) {
return res.status(401).json({ error: 'Missing or invalid Authorization header' });
}
const sessionToken = authHeader.slice(7);
try {
const payload = await verifySessionToken(sessionToken);
const accessToken = await getJwt();
const response = await fetch('https://api.jtl-cloud.com/erp/v2/graphql', {
method: 'POST',
headers: {
'Content-Type': 'application/json',
Authorization: `Bearer ${accessToken}`,
'X-Tenant-ID': payload.tenantId,
},
body: JSON.stringify({
operationName: 'GetERPItems',
query: `
query GetERPItems {
QueryItems(first: 10) {
nodes { id sku name notes basePriceUnit }
totalCount
}
}
`,
}),
});
const body = await response.json();
return res.json(body);
} catch (error) {
console.error('Failed to fetch items:', error);
return res.status(500).json({ error: 'Failed to fetch items' });
}
});
```
The route reads the session token from the `Authorization` header (sent by the frontend as a `Bearer` token), verifies it to extract the tenant ID, fetches a fresh access token, and forwards the GraphQL response back to the frontend as-is.
Create `Backend/Controllers/ItemsController.cs`:
```csharp theme={null}
using System.Net.Http.Headers;
using System.Text;
using Backend.Services;
using Microsoft.AspNetCore.Mvc;
namespace Backend.Controllers;
[ApiController]
[Route("api/items")]
public class ItemsController : ControllerBase
{
private readonly HttpClient _http;
private readonly JtlAuthService _auth;
private readonly SessionVerifier _verifier;
public ItemsController(
IHttpClientFactory httpFactory,
JtlAuthService auth,
SessionVerifier verifier)
{
_http = httpFactory.CreateClient();
_auth = auth;
_verifier = verifier;
}
[HttpGet]
public async Task Get()
{
var authHeader = Request.Headers.Authorization.ToString();
if (string.IsNullOrEmpty(authHeader) || !authHeader.StartsWith("Bearer "))
{
return Unauthorized(new { error = "Missing or invalid Authorization header" });
}
var sessionToken = authHeader.Substring("Bearer ".Length);
try
{
var payload = await _verifier.VerifyAsync(sessionToken);
var accessToken = await _auth.GetJwtAsync();
var query = """
{
"operationName": "GetERPItems",
"query": "query GetERPItems { QueryItems(first: 10) { nodes { id sku name notes basePriceUnit } totalCount } }"
}
""";
var request = new HttpRequestMessage(
HttpMethod.Post,
$"{_auth.ApiBaseUrl}/erp/v2/graphql");
request.Headers.Authorization = new AuthenticationHeaderValue("Bearer", accessToken);
request.Headers.Add("X-Tenant-ID", payload.TenantId);
request.Content = new StringContent(query, Encoding.UTF8, "application/json");
var response = await _http.SendAsync(request);
var body = await response.Content.ReadAsStringAsync();
return Content(body, "application/json");
}
catch (Exception ex)
{
return StatusCode(500, new { error = "Failed to fetch items", details = ex.Message });
}
}
}
```
The controller reads the session token from the `Authorization` header (sent by the frontend as a `Bearer` token), verifies it to extract the tenant ID, fetches a fresh access token, and forwards the GraphQL response back to the frontend as-is.
The existing `app.MapControllers()` call in `Program.cs` already discovers this controller, so no extra registration is needed.
Add the items route to `backend/public/index.php`. Place it alongside the existing `connect-tenant` route:
```php theme={null}
$app->get('/api/items', function (Request $request, Response $response) use ($auth, $verifier, $httpClient) {
$authHeader = $request->getHeaderLine('Authorization');
if (!str_starts_with($authHeader, 'Bearer ')) {
$response->getBody()->write(json_encode(['error' => 'Missing or invalid Authorization header']));
return $response->withStatus(401)->withHeader('Content-Type', 'application/json');
}
$sessionToken = substr($authHeader, 7);
try {
$payload = $verifier->verify($sessionToken);
$accessToken = $auth->getJwt();
$apiResponse = $httpClient->request('POST', JtlAuth::API_BASE_URL . '/erp/v2/graphql', [
'http_errors' => false,
'headers' => [
'Content-Type' => 'application/json',
'Accept' => 'application/json',
'Authorization' => "Bearer {$accessToken}",
'X-Tenant-ID' => $payload['tenantId'],
],
'json' => [
'operationName' => 'GetERPItems',
'query' => 'query GetERPItems { QueryItems(first: 10) { nodes { id sku name notes basePriceUnit } totalCount } }',
],
]);
$body = $apiResponse->getBody()->getContents();
$response->getBody()->write($body);
return $response->withHeader('Content-Type', 'application/json');
} catch (\Throwable $e) {
error_log("Failed to fetch items: {$e->getMessage()}");
$response->getBody()->write(json_encode(['error' => 'Failed to fetch items']));
return $response->withStatus(500)->withHeader('Content-Type', 'application/json');
}
});
```
The route reads the session token from the `Authorization` header (sent by the frontend as a `Bearer` token), verifies it to extract the tenant ID, fetches a fresh access token, and forwards the GraphQL response back to the frontend as-is.
## 7. Display Items in the ERP Page
Replace `frontend/src/routes/_shell.erp.tsx` with a version that fetches and renders the products:
```tsx theme={null}
import { createFileRoute } from '@tanstack/react-router';
import { Box, Text } from '@jtl-software/platform-ui-react';
import { useCallback, useEffect, useState } from 'react';
import { useAppBridge } from '../appBridge';
interface Item {
id: string;
sku: string;
name: string;
}
interface ItemsResponse {
data: {
QueryItems: {
nodes: Item[];
totalCount: number;
};
};
}
function ErpPage() {
const { appBridge, tenantId } = useAppBridge();
const [items, setItems] = useState([]);
const [totalCount, setTotalCount] = useState(0);
const [loading, setLoading] = useState(false);
const [error, setError] = useState(null);
const fetchItems = useCallback(async () => {
if (!appBridge) return;
try {
setLoading(true);
const sessionToken =
await appBridge.method.call('getSessionToken');
const res = await fetch('/api/items', {
headers: { Authorization: `Bearer ${sessionToken}` },
});
if (!res.ok) {
throw new Error(`Request failed (${res.status})`);
}
const data: ItemsResponse = await res.json();
setItems(data.data.QueryItems.nodes || []);
setTotalCount(data.data.QueryItems.totalCount || 0);
} catch (err) {
console.error(String(err));
setError(
err instanceof Error ? err.message : 'Failed to load products',
);
} finally {
setLoading(false);
}
}, [appBridge]);
useEffect(() => {
fetchItems();
}, [fetchItems]);
if (error) {
return (
Error
{error}
);
}
return (
My JTL Cloud App
Connected to tenant:{' '}
{tenantId}
Products from Cloud-ERP
{loading ? (
Loading products...
) : items.length === 0 ? (
No products found. Make sure your test account has items in
Cloud-ERP.
) : (
<>
Showing {items.length} of {totalCount} products
| sku |
name
|
{items.map((item) => (
|
{item.sku}
|
{item.name}
|
))}
)}
);
}
export const Route = createFileRoute('/_shell/erp')({
component: ErpPage,
});
```
On mount, the component requests a session token from the AppBridge, sends it to your backend as the `Authorization` header, and renders the returned products in a table. The session token round-trip means the backend always knows which tenant the request belongs to, even though the frontend only ever holds a short-lived signed token.
A sample response from the GraphQL API looks like this:
```json theme={null}
{
"data": {
"QueryItems": {
"nodes": [
{
"id": "895d2d4d-4ed4-44c7-ac61-ebec01000000",
"sku": "AR2016041-VKO",
"name": "Men's T-shirt"
},
{
"id": "895d2d4d-4ed4-44c7-ac61-ebec06000000",
"sku": "AR2016041-002",
"name": "Men's T-shirt orange S"
}
],
"totalCount": 674
}
}
}
```
## 8. Open the App from the ERP Menu
In the [ERP Cloud](https://erp.jtl-cloud.com), navigate to the **App** menu and find the **My JTL App** menu item that the manifest registered. Clicking it loads `/erp` inside the App Shell.
You should see a header reading **My JTL Cloud App**, the connected tenant ID, and a table listing the first ten products from your JTL-Wawi instance.
This completes the full handshake flow: the App Shell loads your frontend in an iframe, AppBridge provides a short-lived session token, your backend verifies the token and uses its access token to make a tenant-scoped request to the JTL Cloud API, and the response is returned to the browser.
## Common Issues
This error usually means TypeScript and Node are resolving modules differently.
With `"type": "module"` in `package.json` and `"module": "NodeNext"` in `tsconfig.json`, Node expects ES module imports to include file extensions. Even if your source file is `jtl-auth.ts`, the import must use `./jtl-auth.js`.
TypeScript resolves this correctly during development, and Node finds the compiled `.js` file at runtime.
If you prefer not to use `.js` extensions, switch to `"module": "CommonJS"` in `tsconfig.json` and remove `"type": "module"` from `package.json`.
This means the backend started without loading your environment variables.
The most common cause is running Node without the `--env-file=.env` flag. In that case, the `.env` file exists but is never read.
The `dev` and `start` scripts already include this flag. If you're running the server manually, add it back or use `npm run dev`.
Also confirm that the `.env` file is inside the `backend/` directory. The path is resolved relative to where Node is executed.
A 401 from the auth endpoint means the credentials are not valid.
If you are still using placeholder values, this is expected. Real credentials are provided after registering your app in the Partner Portal.
If you have already registered:
* check for typos or extra spaces in `.env`
* restart the dev server after making changes
Environment variables are only read at startup, so updates to `.env` require a restart.
This usually means the backend responded, but not with a successful (2xx) response.
The frontend treats any non-2xx response as an error and shows the placeholder state.
Open the browser console and inspect the `/api/connect-tenant` response:
* a 401 is expected at this stage without real credentials
* a 500 or network error indicates a backend issue (check server logs)
Once valid credentials are configured, this state resolves automatically.
This means the browser blocked the response due to an origin mismatch.
The backend allows requests from `http://localhost:5173`, which is the default Vite dev server port. If Vite runs on a different port (for example, 5174), the request will be rejected.
Update the `origin` in `server.ts` to match the actual port, or restart Vite on 5173.
If you're using the Vite dev proxy for `/api/*`, CORS should not appear. Seeing this error usually means the request is being made directly to the backend instead of going through the proxy.
## What's Next?
You've built a working JTL Cloud App from scratch: a frontend that runs inside the JTL App Shell, a backend that verifies session tokens and proxies requests to the JTL Cloud API, and a real connection to a tenant pulling live product data. Where to go from here:
Validate your app in the sandbox with test data.
Use the JTL-Wawi REST and GraphQL APIs, handle responses, and work with tenant-scoped data.
Try queries and mutations interactively against your ERP instance.
Learn how to integrate deeper with the JTL UI and App Shell.
Deploy your app and publish it for merchants.